Configure TLS
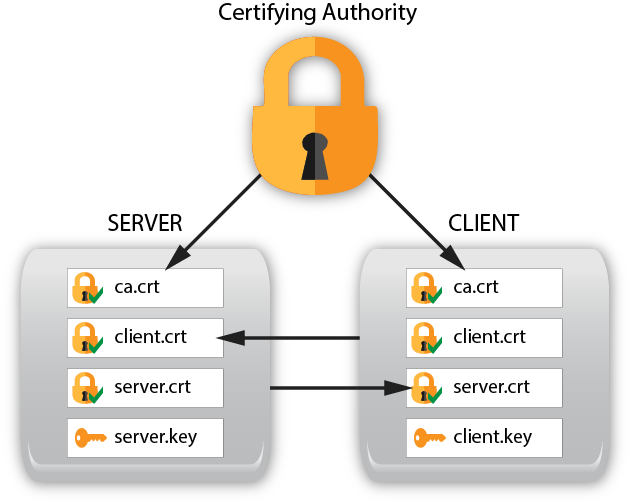
To enable Transport Layer Security (TLS) between the server and client you need to setup both the server and the client with appropriate certificates and configuration. The following instructions walk you through the setup process.
Refer to the server TLS Configuration section for complete details on the available CLI parameters and YANG modules.
This section explains how to setup X.509 certificates on the client and server so TLS can be used.
Server TLS Setup
On the server create 2 directories for working with the certificates and copy the generate-keys.sh script to the buildcerts directory that was just created:
mkdir $HOME/buildcerts
mkdir $HOME/certs
cp /usr/share/yumapro/util/generate-keys.sh $HOME/buildcerts
Change the directory to the buildcerts directory, run the key generation script and check the files were created:
cd buildcerts
./generate-keys.sh
Example output files
buildcerts> ls -l

-rw-rw-r-- 1 andy andy  956 Mar 16 15:05 ca.crt
-rw-rw-r-- 1 andy andy  883 Mar 16 15:05 ca.csr
-rw-rw-r-- 1 andy andy 1708 Mar 16 15:05 ca.key
-rw-rw-r-- 1 andy andy   17 Mar 16 15:05 ca.srl
-rw-rw-r-- 1 andy andy  969 Mar 16 15:05 client.crt
-rw-rw-r-- 1 andy andy  891 Mar 16 15:05 client.csr
-rw-rw-r-- 1 andy andy 1708 Mar 16 15:05 client.key
-rwxrwxr-x 1 andy andy 1513 Feb 23 16:29 generate-keys.sh
-rw-rw-r-- 1 andy andy  969 Mar 16 15:05 server.crt
-rw-rw-r-- 1 andy andy  891 Mar 16 15:05 server.csr
-rw-rw-r-- 1 andy andy 1704 Mar 16 15:05 server.key
Generating Certificates with a SAN
A Subject Alternative Name (SAN) can be configured into a TLS X.509 certificate if the OpenSSL version supports X509v3.
Customize the parameters within the script as needed. There are 2 example scripts for generating keys.
generate-keys.sh : x509 certificates that rely on legacy Common Name field
generate-san-keys.sh : x509 certificates that use SANs instead
The generate-keys.sh script will generate keys and certs for the “restconf” site. You can use the keys created by this script to setup TLS for your restconf site as described in Setup TLS Certificates for the RESTCONF Site
The generate-san-keys.sh script will generate x509 certificates that use SANs. You can use the keys created by this script to setup TLS for your gNMI application.
Copy the certificates to their proper places:
buildcerts> sudo cp ca.crt /usr/local/share/ca-certificates/
buildcerts> cp server.crt ../certs/
buildcerts> cp server.key ../certs/
buildcerts> sudo update-ca-certificates
buildcerts> ls /etc/ssl/certs -l | grep ca.crt
lrwxrwxrwx 1 root root     39 Mar 16 15:52 ca.pem -> /usr/local/share/ca-certificates/ca.crt
The script update-ca-certificates uses the ca-certificates package. If you do not have this package on your system, then use the following steps, instead of the section above This could be the case if you are building a minimal footprint system.
This will create the required certificate links:
buildcerts> mkdir temp
buildcerts> sudo ln -s /usr/local/share/ca-certificates/ca.crt temp/ca.pem
buildcerts> sudo c_rehash temp
 Doing temp
buildcerts> sudo mv temp/* /etc/ssl/certs
buildcerts> ls -l /etc/ssl/certs | grep ca.pem
 lrwxrwxrwx 1 root root      6 Mar 16 08:00 56c899cd.0 -> ca.pem
 lrwxrwxrwx 1 root root      6 Mar 16 08:00 b2457b50.0 -> ca.pem
 lrwxrwxrwx 1 root root     39 Mar 16 08:00 ca.pem -> /usr/local/share/ca-certificates/ca.crt
buildcerts>
Generate the Client Fingerprint:
Note
If the SAN version is used for the client certificate, and the --tls-autosan-mode='true', then this step is not needed.
certs> cd $HOME/buildcerts
buildcerts> openssl x509 -noout -fingerprint -sha1 -inform pem -in client.crt

SHA1         Fingerprint=4B:A7:05:1E:12:F7:BC:FF:2D:9E:48:66:0A:8B:CC:D7:A5:65:E5:97
Check the Client Subject Alternate Name:
If the generate-san-keys.sh script is used then the SAN field should be set in the client.crt file. Use the following command to check it. For example, if the email address 'fred@example.com' was configured:
buildcerts> openssl x509 -noout -ext subjectAltName -in client.crt
X509v3 Subject Alternative Name:
   email:fred@example.com
buildcerts>
Create the --cert-usermap Parameter
Note
The yumaworks-cert-usermap.yang module can now be used to configure Certificate to User Identity Mappings defined in RFC 7589. Refer to NETCONF Over TLS for additional details on using this module.
The --tls-autosan-mode CLI parameter can be used instead of a 'cert-to-name' mapping. In this mode, any valid SAN field will be used as the username.
The --cert-usermap parameter is supported by netconfd-pro to map a user-name to a client fingerprint.
The parameter has the form:
<YOUR_USERNAME>@<SHA1_Fingerprint>
For example if user=andy creates the SHA1 Fingerprint then the cert-usermap parameter line should be:
cert-usermap andy@4B:A7:05:1E:12:F7:BC:FF:2D:9E:48:66:0A:8B:CC:D7:A5:65:E5:97
Note
Even though the CLI parameter will accept as few as 6 pairs of digits, the full fingerprint value should be used.
Add the --cert-usermap Parameter to the Server Configuration File
The default server configuration file is /etc/yumapro/netconfd-pro.conf.
It can be different on some platforms, It can also be changed
with the --config CLI parameter.
netconfd-pro {

    with-netconf-tls true
    netconf-tls-certificate ~/certs/server.crt
    netconf-tls-key ~/certs/server.key

    # use the parameter you created in the previous step, not this string
    cert-usermap andy@4B:A7:05:1E:12:F7:BC:FF:2D:9E:48:66:0A:8B:CC:D7:A5:65:E5:97
}
Client TLS Setup
Generate Keys
On the client create 2 directories for working with the certificates:
CLIENT:
mkdir $HOME/buildcerts
mkdir $HOME/certs
Copy Keys to Server
On the server copy the files you created to the client machine using sftp:
SERVER:
cd $HOME/buildcerts
sftp CLIENT_USERNAME@CLIENT
cd buildcerts
put *
bye
Now copy the certificates on the client to their proper places:
CLIENT:
cd $HOME/buildcerts
sudo cp ca.crt /usr/local/share/ca-certificates
cp client.crt $HOME/certs/
cp client.key $HOME/certs/
Go to the /etc/ssl/certs directory, run updates and check the results:
CLIENT:
cd /etc/ssl/certs
sudo update-ca-certificates
ls -l | grep ca.crt
Output:
lrwxrwxrwx 1 root root 39 Mar 16 16:25 ca.pem -> /usr/local/share/ca-certificates/ca.crt
Add yangcli-pro CLI Parameters for TLS
The parameters needed to use TLS must be added to the yangcli-pro.conf file.
If you have an existing yangcli-pro.conf then add the two parameter lines
to the existing file. If you do not have an existing yangcli-pro.conf file
then one needs to be created. The default is /etc/yumapro/yangcli-pro.conf
but this can be changed with the --config CLI parameter.
yangcli-pro {

    ssl-certificate ~/certs/client.crt
    ssl-key ~/certs/client.key
}
Test the TLS Connection
Use the yangcli-pro Connect procedure to test the TLS connection and run the server as you would normally.
If the client TLS keys are configured so no password is required, then the "no-password" parameter can be used in the "connect" command:
Example connect command (for user 'andy' connecting to 192.168.1.20):
connect user=andy server=192.168.1.20 no-password transport=tls