Build For Yocto Linux
The build host tools need to be setup before the server can be built.
Warning
The Pyro branch (Yocto 2.3) is now EOL and no longer supported.
The meta-yumapro recipes will no longer work with older Yocto versions such as Pyro.
Refer to Migration Guide for details on the Yocto syntax changes.
The Yocto Versions currently supported are 'Kirkstone' and 'Scarthgap'
Older meta-yumapro releases (prior to 21.10-13) are not compatible with this Yocto branch. The 'Pyro' branch must continue to be used for those older releases.
The following diagram shows the directories that the user is expected to setup (in blue) and the directories that the supplied software will add. The actual release train number (e.g. 22.10) will be used, not 17.10.
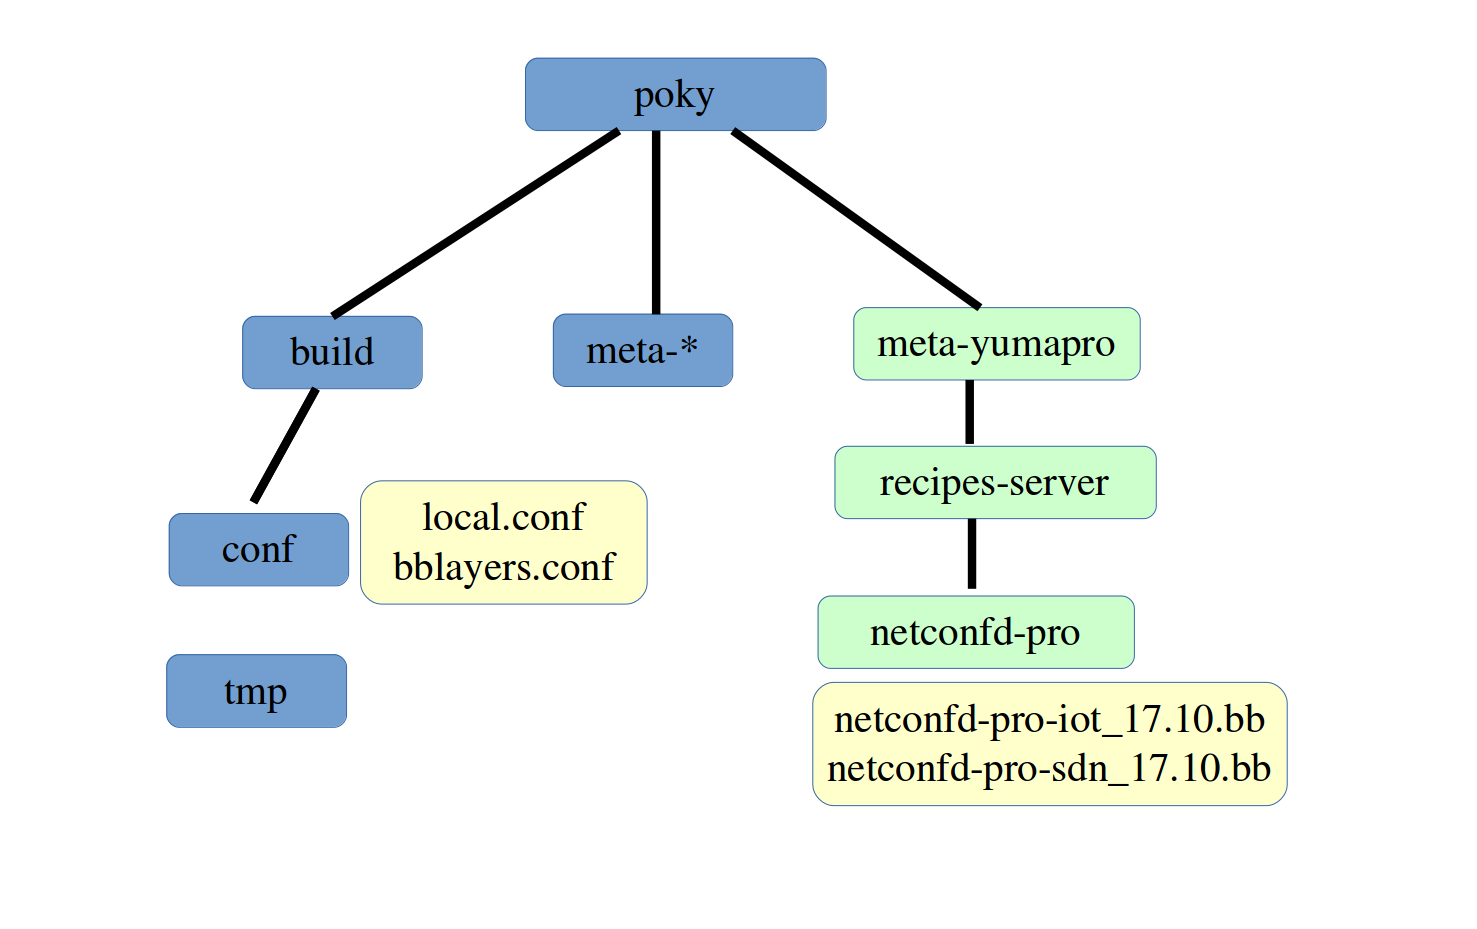
Directory |
Description |
poky |
Yocto installation of poky build system |
build |
Root of all build directories |
conf |
Build configuration directory. Edit local.conf and bblayers.conf |
tmp |
Root of all bitbake generated build files |
meta-* |
Several opensource layer directories |
meta-yumapro |
Root of the yumapro layer bitbake files |
recipes-server |
Root directory for all yumapro server recipes |
netconfd-pro |
Root directory of all netconfd-pro recipes (IoT and SDN) |
The netconfd-pro-iot and netconfd-pro-sdn recipes are designed to integrate with certain open source recipes, in order to automatically produce a system image with a running system, upon first boot.
The following recipes are used by the yumapro server recipes:
base-files: Used to add yp-shell to
/etc/shellsdropbear: Used to integrate netconfd-pro-iot support into dropbear and configure boot-time parameters
openssh: Used to configure netconfd-pro-sdn boot-time parameters into OpenSSH
lighttpd: Used to configure RESTCONF server boot-time parameters for lighttpd WEB server
net-snmp: Used to integrate SNMP protocol support and configure boot-time SNMP parameters
Setup Yocto Linux
These instructions do not override the Yocto documentation.
This document is not a yocto tutorial. Refer to the Yocto documentation for details on using the Yocto and bitbake software.
Yocto Project Quick Start Guide
Yocto Project Developer Manual
Install Yocto
Follow the instructions in the Yocto Quick Start guide.
Example Ubuntu Install.
Note
Use the Yocto instructions online from the Yocto Project: The example below may be out of date.
Install dependencies
sudo apt-get install gawk wget git-core diffstat unzip texinfo gcc-multilib \
build-essential chrpath socat cpio python3 python3-pip python3-pexpect \
xz-utils debianutils iputils-ping libsdl1.2-dev xterm
Install poky and select branch
git clone git://git.yoctoproject.org/poky
cd poky

# Checkout branch that matches the meta-yumapro tarball.
git checkout kirkstone  # or scarthgap
Note
It is a good idea to test your yocto installation at this point by building an image such as 'core-image-minimal'.
~/poky> . ./oe-init-build-env

~/poky/build>  bitbake core-image-minimal
Add meta-webserver layer
# make sure this is done from poky directory
git clone git://git.openembedded.org/meta-openembedded
cd meta-openembedded
git checkout kirkstone  # or scarthgap
cd ..
Add meta-yumaro layer
See the Installation section
Setup Build Configuration
Starting in the 'poky' directory, source the environment file to enable bitbake.
Then cd to the “conf” directory and edit the configuration files.
source oe-init-build-env

build> cd conf

build/conf>
Edit local.conf:
Enable a target platform. The default is the i586 architecture on the qemu86 virtual target. Refer to the Yocto Quick start guide to enable different targets and board support packages (BSPs).
Add the netconfd-pro server recipe to the image. Choose either netconfd-pro-iot or netconfd-pro-sdn, but not both. Example for netconfd-pro-sdn:
IMAGE_INSTALL:append = " netconfd-pro-sdn"
Edit bblayers.conf:
Enable layers needed to build the desired Yocto Linux system variants. The following example shows the layers needed for all variants of the netconfd-pro server. The file locations will be different depending on your Yocto installation location.
In this example replace
/home/andy/swdevwith the real path to the 'poky' directory on your system.
BBLAYERS ?= " \
  /home/andy/swdev/poky/meta \
  /home/andy/swdev/poky/meta-poky \
  /home/andy/swdev/poky/meta-yocto-bsp \
  /home/andy/swdev/poky/meta-openembedded/meta-oe \
  /home/andy/swdev/poky/meta-openembedded/meta-python \
  /home/andy/swdev/poky/meta-openembedded/meta-networking \
  /home/andy/swdev/poky/meta-openembedded/meta-webserver \
  /home/andy/swdev/poky/meta-yumapro \
"
meta-yumapro Layer
The meta-yumapro tarball contains “yumapro” layer files required to build, install, and integrate a multi-protocol server for Yocto Linux.
Installation
If you have access to the 'yumapro' and 'yumapro-server' source tarballs then use the 'meta-yumapro' tarball that includes the source code.
If you have access to the 'yumapro-server2' or 'yumapro-server3' source tarballs then use the 'meta-yumapro-raw' tarball that does not include the source code. An extra step to add source code and edit the recipe is needed in this case.
Tarball Naming Conventions
The filename structure of the tarball file is as follows:
meta-yumapro-<version>.gz
Example Filename:
meta-yumapro-22.10-8.tar.gz
Extract to the poky Directory
The files need to be extracted to the poky directory so subtrees can be integrated into the build environment for the server.
Extraction Example:
> cd poky
> tar xvf meta-yumapro-22.10-8.tar.gz
Creates a directory named meta-yumapro in the current directory.
Extra Installation Steps for meta-yumapro-raw
The 'yumapro-server2' and 'yumapro-server3' source packages do not contain the the 'yp-shell' source code. The WITH_CLI=1 make flag has to be removed from the recipe files.
First add the source tarball to the correct file location.
Example:
> cp yumapro-server2-22.10-8.tar.gz poky/meta-yumapro/recipes-server/netconfd-pro/files/
Second, edit the 'netconfd-pro.inc' file in the 'poky/meta-yumapro/recipes-server/netconfd-pro' directory. The yp-shell CLI must be disabled if it is not present in the source code.
netconfd-pro.inc file section before editing:
# add for CLI protocol (yp-shell over SSH)
###  CLI NOT AVAILABLE IN SERVER2; MUST COMMENT OUT IF SERVER2
EXTRA_OEMAKE += "WITH_CLI=1"
DEPENDS += "ncurses libssh2"
FILES:${PN} += "${bindir}/yp-shell"
RPROVIDES:${PN} += "yp-shell"
CONFFILES:${PN} += "${sysconfdir}/yumapro/yangcli-pro.conf"
netconfd-pro.inc file section after editing:
 # add for CLI protocol (yp-shell over SSH)
 ###  CLI NOT AVAILABLE IN SERVER2; MUST COMMENT OUT IF SERVER2
 #EXTRA_OEMAKE += "WITH_CLI=1"
 #DEPENDS += "ncurses libssh2"
 #FILES:${PN} += "${bindir}/yp-shell"
 #RPROVIDES:${PN} += "yp-shell"
 #CONFFILES:${PN} += "${sysconfdir}/yumapro/yangcli-pro.conf"
Configuration
The only recipes supported at this time are “netconfd-pro-iot” and “netconfd-pro-sdn”. The configuration files for these recipes are located in the directory poky/meta-yumapro/recipes-server/netconfd-pro. There are several features that can be enabled or disabled by uncommenting or commenting a set of directives.
The set of recipe files:
netconfd-pro.inc: common recipe file
Refer to the Customization section for details on modifying this file for your project
netconfd-pro-iot.inc: IoT configuration recipe file
netconfd-pro-sdn.inc: SDN configuration recipe file
netconfd-pro-iot_22.10.bb: IoT configuration main recipe file for 22.10 release train. (Actual number will depend on the release train.)
netconfd-pro-sdn_22.10.bb: SDN configuration main recipe file for 22.10 release train. (Actual number will depend on the release train.)
Customization
The meta-yumapro/recipes-server/netconfd-pro directory contains the recipe files for the server. The file netconfd-pro.inc can be modified to set the compiler flags.
The meta-yumapro/recipes-server/netconfd-pro/files directory contains some text files that should be modified to support the Yocto server deployment.
netconfd-pro.inc
The file netconfd-pro.inc contains the main part of the server recipe. This file can be customized based on your platform feature requirements.
Refer to the YumaPro README file for a description of each make flag supported by the YumaPro source code.
This section highlights some portions of these bitbake rules. It is not intended to be any sort of tutorial on bitbake configuration.
CLI (yp-shell)
This feature is enabled by default. To disable it follow the instructions in the previous section: Extra Installation Steps for meta-yumapro-raw.
RESTCONF
This feature is enabled by default:
# add for RESTCONF protocol
EXTRA_OEMAKE += "WITH_RESTCONF=1 WEB_USER=root WEB_GROUP=root"
DEPENDS += "fcgi"
RDEPENDS:${PN} += "lighttpd fcgi lighttpd-module-fastcgi"
FILES:${PN} += "${sbindir}/restconf"
RPROVIDES:${PN} += "restconf"
To disable RESTCONF and remove the dependency on 'fcgi', comment out this section:
 # add for RESTCONF protocol
 # EXTRA_OEMAKE += "WITH_RESTCONF=1 WEB_USER=root WEB_GROUP=root"
 # DEPENDS += "fcgi"
 # RDEPENDS:${PN} += "lighttpd fcgi lighttpd-module-fastcgi"
 # FILES:${PN} += "${sbindir}/restconf"
 # RPROVIDES:${PN} += "restconf"
SNMP
This feature is enabled by default:
# add for SNMP protocol requires WITH_RESTCONF=1
EXTRA_OEMAKE += "WITH_SNMP=1"
DEPENDS += "net-snmp"
RDEPENDS:${PN} += "net-snmp-libs net-snmp-mibs"
To disable SNMP and remove the dependency on 'net-snmp', comment out this section:
 # add for SNMP protocol requires WITH_RESTCONF=1
 #EXTRA_OEMAKE += "WITH_SNMP=1"
 #DEPENDS += "net-snmp"
 #RDEPENDS:${PN} += "net-snmp-libs net-snmp-mibs"
DEBUG
The DEBUG=1 flag is not enabled by default.
This flag allows #ifdef DEBUG code to be enabled and also enables
debug symbols.
# add for GDB symbols and ifdef DEBUG
# MUST NOT BE SET IN PRODUCTION BUILDS
# FOR TESTING PURPOSES ONLY
# EXTRA_OEMAKE += " DEBUG=1"
To enable debugging symbols, uncomment this section:
 # add for GDB symbols and ifdef DEBUG
 # MUST NOT BE SET IN PRODUCTION BUILDS
 # FOR TESTING PURPOSES ONLY
 EXTRA_OEMAKE += " DEBUG=1"
LIB64
The LIB64=1 flag is not enabled by default.
This flag should only be added to fix the bitbake error described below
# fix for WR Linux using /usr/lib64 instead of /usr/lib
# uncomment if QA_Error for unpackaged libraries in do_package
# EXTRA_OEMAKE += "LIB64=1"
To use the lib64 directory instead of lib directory,
uncomment this section:
 # fix for WR Linux using /usr/lib64 instead of /usr/lib
 # uncomment if QA_Error for unpackaged libraries in do_package
 EXTRA_OEMAKE += "LIB64=1"
32 Bit Platforms
The NO_YPACK=1 flag is required for 32-bit platforms.
Some source code uses packed structures which can cause alignment problems on processors which require 32-bit word alignment. This make flag is used to disable the packed data structures.
This flag is disabled by default:
# fix for BUS Error on ARM32
# Must set the NO_YPACK macro for 32-bit ARM
# EXTRA_OEMAKE += "NO_YPACK=1"
To use the NO_YPACK=1 flag to disable packed data structures,
uncomment this section:
 # fix for BUS Error on ARM32
 # Must set the NO_YPACK macro for 32-bit ARM
 EXTRA_OEMAKE += "NO_YPACK=1"
netconfd-pro.conf
The files/netconfd-pro.conf file contains the server configuration.
This file should be modified to change default settings and to
add and configure the modules and bundles loaded into the YANG library
for the server.
Typically, the following parameters are used to configure the YANG modules used in the server:
sm-config.json
If the Schema Mount feature is used then the files/sm-config.json
file needs to be replaced with the real version needed by the server.
The --sm-config parameter must be configured in the server config file.
The file is ignored unless this CLI parameter is set.
snmpd.conf
If SNMP is enabled, then the 'snmpd.conf' file should be configured. Refer to the YumaPro yp-snmp Manual for details.
yangcli-pro.conf
If yp-shell is enabled, then the 'yangcli-pro.conf' file should be configured, if any non-default settings are required for yp-shell'. Refer to the YumaPro yangcli-pro Manual for details.
Yocto SIL Libraries
Note
This feature is available starting in 22.10T-11
It is possible to add your own SIL code to the server by adding your source code to the yumapro-server source tree.
There are some simple steps required to add source code and YANG modules to the yumapro-server source tree:
Prepare the SIL library directory
Replace the 'src' Makefile
The Makefile in the 'src' directory of the SIL code needs to be replaced with a Makefile that is integrated with the YumaPro source code.
There is one section that must be set:
MODULE_NAME must be set to the module or bundle name
There are some sections that may need to be set depending on your SIL code:
SUBDIR_CPP can be used to add compiler flags
SUBDIR_LD can be used to add linker flags
SA must be set to
_safor SIL-SA (not officially supported for Yocto)
There is an example Makefile in the extra/example/src directory:
# SIL Makefile for YumaPro Server Instrumentation Library
#

############### SOURCE PROFILE ##############################

# set to the library name
# e.g. foo for --module=foo or --bundle=foo
MODULE_NAME=example

# do not change
SUBDIR_NM=$(MODULE_NAME)

# add -I for include path or other flags to pass to compiler
SUBDIR_CPP=

# add -L and -l for linking external libraries used by this library
SUBDIR_LD=

# Use only if object files from other dirs should be linked here
SUBDIR_OBJ=

# leave empty for SIL; set to _sa for SIL-SA
SA=

# do not change rest of Makefile

include ../../../top-common.make
include ../../../top-sil.make

CINC += -I../../../netconf/src/platform -I../../../netconf/src/ncx \
 -I../../../netconf/src/agt


# prevent the make program from choking on all the symbols
# that get generated from autogenerated make rules
.NOEXPORT:

include ./dependencies
Unpack the Source Tarball
The source tarball is located
in the meta-yumapro/recipes-server/netconfd-pro/files directory.
First 'cd' to this directory.
The example version '22.10T-9' is used below but the actual version will match the archive file.
Example filename:
yumapro-server-22.10T-9.tar.gz
Unpack the archive file with the 'tar' command:
> tar xvf yumapro-server-22.10T-9.tar.gz
There should now be a directory named 'yumapro-server-22.10T-9`.
Add SIL Libraries to 'extra'
Assuming the directory /home/user/mymodule contains the SIL code to
add then the following command could be used to copy the files
into the 'extra' directory:
> cp -R /home/user/mymodule yumapro-server-22.10T-9/extra
Note that the 'extra' directory can contain any number of libraries, including none. No configuration is required at all. The 'example' module has no source code and is automatically skipped if 'make' is run in the 'extra' directory.
Add YANG Modules to 'netconf/modules/extra'
Additional YANG modules can be added to
the netconf/modules/extra directory.
First create the 'extra' directory since it is not part
of the source distribution.
> mkdir -p yumapro-server-22.10T-9/netconf/modules/extra
Any number of files and sub-directories can be added to the 'extra' directory.
Do not include any modules that are already installed in the 'modules' directory.
Assuming the directory /home/user/modules contains the
YANG modules to add to the server, the following command
could be used to copy the files
into the 'extra' directory:
> cp -R /home/user/modules yumapro-server-22.10T-9/netconf/modules/extra
Repack the Source Tarball
Once the 'extra' SIL code and YANG modules have been added, the source tarball must be repacked. The old source tarball should be deleted (or moved) first. The expanded copy that was just altered should be deleted.
> rm yumapro-server-22.10T-9.tar.gz
> tar cvzf yumapro-server-22.10T-9.tar.gz yumapro-server-22.10T-9
> rm -rf yumapro-server-22.10T-9