YumaBench User Manual
YumaBench Introduction
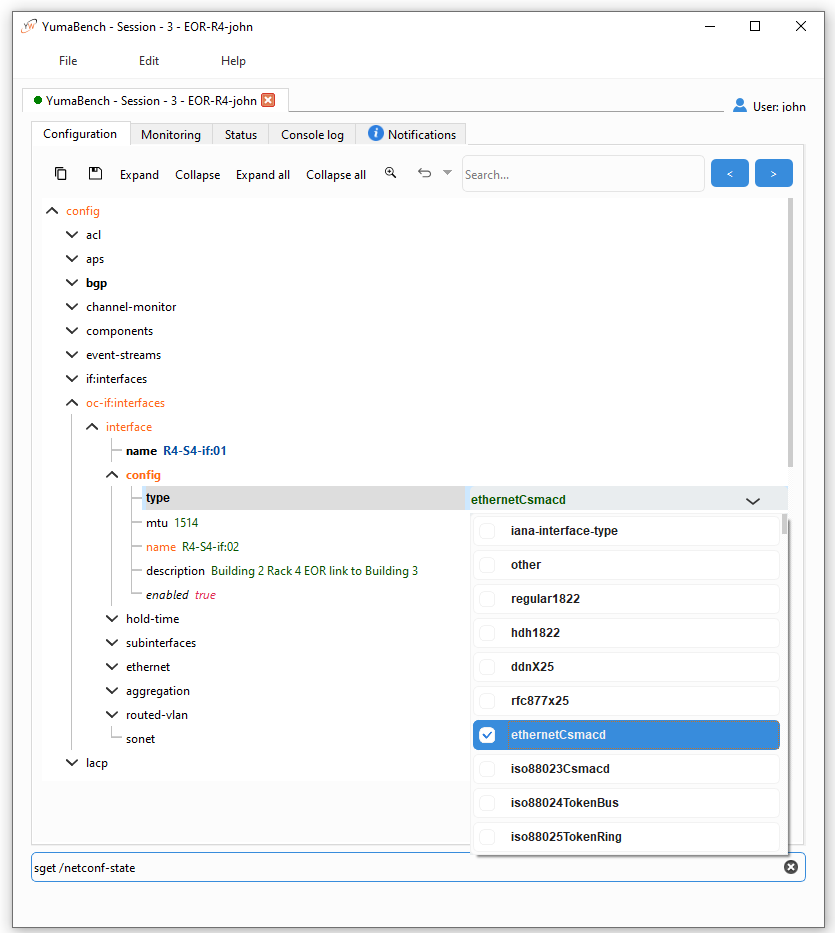
YumaBench makes NETCONF and YANG management easy. Its intuitive graphical interface lets you configure, monitor, and manage network devices quickly - without working directly with XML.
With YumaBench, you can:
Manage multiple NETCONF sessions
Browse and edit YANG data visually
Quickly configure network devices
Monitor telemetry and notifications
Customize views to match your workflow
Built on proven YumaPro SDK technology, YumaBench puts powerful NETCONF and YANG capabilities at your fingertips—so you can get more done, faster.
YANG Based Network Management
The NETCONF protocol uses data model abstractions to represent the data that can be exchanged between a client and a server. The YANG language [RFC 7950] is used for this purpose.
The YumaBench program can use the YANG data model information to automatically perform NETCONF protocol operations. A combination of command line and GUI components are data-driven from the set of YANG modules supported by each server.
Each server can support a different set of YANG modules. The YumaBench program provides a Main Window to launch management sessions and perform other tasks. Each management session has its own Session Window that is independent of all other Session Windows, runs in its own process and handle its own network IO with the server.
The YumaBench program provides many features to simplify and automate the NETCONF protocol operations:
Session management (device, user, protocol, transport, reconnect, etc.)
Data Management (hierarchy of YANG data variables)
Operation Management (send requests to a server and process/observe the responses)
Configuration Management (conduct YANG configuration edit transactions on a server)
Event Management (listen for events and process them with scripts and hard-wired handlers)
Operation Automation (bash-like scripts for automating a sequence of operations)
Test Automation (test suites for positive and negative protocol operation testing)
Use Cases for YumaBench
YumaPro Server Development Testing: A vendor of networking devices must add support for specific YANG modules in the normal course of product development. The engineers doing this development need to design, implement, and test the new management protocol functionality during development (unit testing) and over time (regression testing). The YumaBench program can be used in the testing process to ensure the management interface defined by the YANG modules is implemented correctly.
Operator Developed Management Procedures:Operators of networking equipment that supports the NETCONF protocol can be semi-automated by using scripts and interactive operations to access the YANG-based management interface. These operators often develop their own scripts and procedures in addition to the network management systems provided by the equipment vendor.
Operation Work Flow
A typical work flow for YumaBench would be to perform Create, Retrieve, Update, and Delete operations on the YANG-based configuration data structures. The Session window allows the user to perform CRUD operations while connected to the server.
The YANG data structures are hierarchical trees, typically starting with a top-level container. The example module address.yang has a top-level container name “addresses”. This container has zero or more “address” list entries.
The user will create, update, and/or delete specific data subtrees on the server. This might need to be done in a specific order if there are cross-dependencies in the data. These operations are not much different than setting program parameters in the Preferences window, except the “Apply” button callback will cause the client to send an edit request to the server and wait for the response.
The GUI is capable of:
zooming in or out of a user-selected sub-trees
displaying a hybrid schema tree / data tree representing the current subtree
creating a data subtree (such as addresses or address) if it does not exist yet
modifying a data subtree if it already exists
deleting a data subtree
Setting Up YumaBench
Setup Prerequisites
YumaBench is currently available on 64-bit versions of:
Ubuntu 22.04 and 24.04
Debian 12
Fedora 39, 40 and 41
CentOS Stream 9
Red Hat Enterprise Linux 9
macOS Ventura and Sonoma on Apple silicon systems
Windows 10 and 11
Installation and Startup
Please follow the instructions in the YumaBench Installation Guide.
To launch YumaBench simply type in yuma-bench in a terminal window. Depending on your operating system you may also be able to select the YumaWorks icon: |
|

The Setup Wizard
When YumaBench starts it checks if this is the first time it has been run, that is it checks if there is a configuration for any Sessions, Users or Devices. If none are found the Setup Wizard is launched to help quickly create an initial Session:
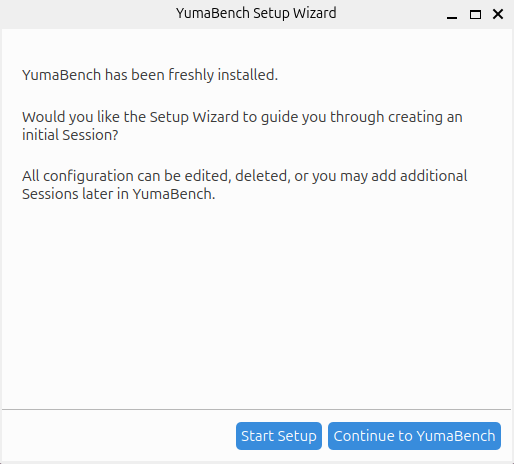
If you don’t want the Setup Wizard to help you create a Session then select “Continue to YumaBench” and the Setup Wizard will exit and display the YumaBench Main Window. In which case continue in this document to the section Main Window.
If you want to use the Setup Wizard to guide you through creating an initial Session, select “Start Setup”.
Any data you use in the Setup Wizard for your initial Session can be edited or deleted at any time in YumaBench.
The Setup Wizard presents individual screens to create a Device, a User, and then a Session that is based on the Device and User that have been created.
Selecting “Exit to YumaBench” at any time in the Setup Wizard will save any complete Device, User or Session that has been completed and launch the YumaBench Main Window.
Each Screen has a Comment section where you can enter any text that you may find useful in managing the Device, User or Session.
Each screen has a “< Back” button that will return to the previous screen and a “Next” button that proceeds to the next configuration screen in the sequence.
All the data entered will be saved when you exit the Setup Wizard.
First a Device will be setup using the following screen:
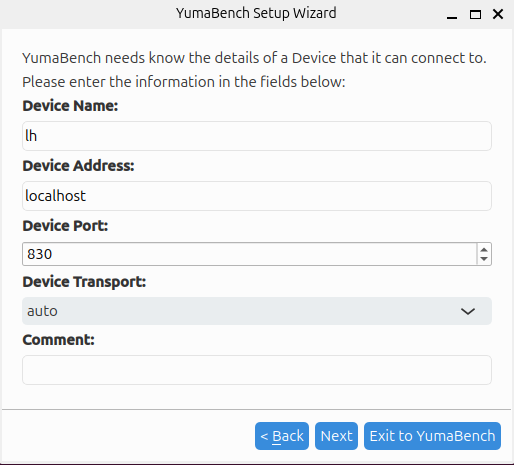
Enter the Device Name which is the name you choose to identify the device. Examples could be: building1-router, main-floor-switch, or as in the example above lh.
Then input the Device Address. This is the address that identifies the device on the network. It can either be a name or an IP address. If a name is used the name must be able to resolve to the devices IP address through your network’s naming service such as DNS.
Initially you can just leave the Device Port as the default and Device Transport as “auto”. If you need to change these see this document’s section “Devices” on how to set these up.
After you have setup the Device select “Next”
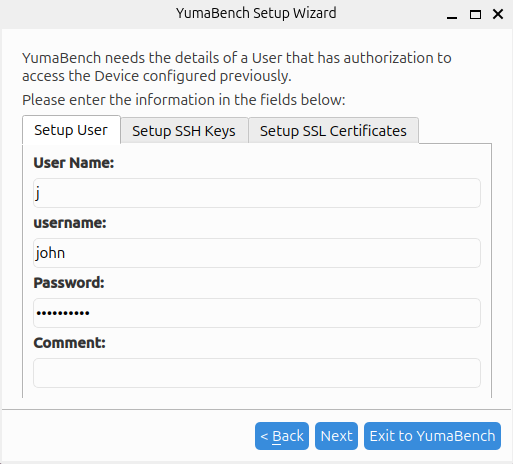
This screen is used to create a User. For the YumaBench Session you are creating to be able to connect to the device you created previously the User must have authorized access to the Device.
Enter the User Name which is the name you choose to identify the user. Examples could be: john, Luis, admin-group, or as in the example above “j”.
Then enter the username and Password that are the access credentials for the Device and select “Next”.
If your device is using SSH keys or SSL certificates see this document’s section “Users” on how to set these up.
The final setup screen is the Session screen:
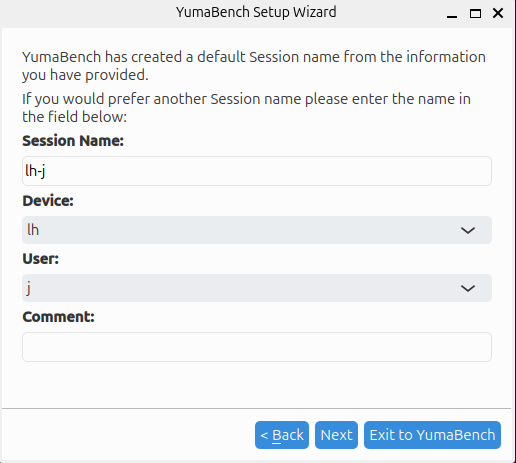
The Device and User names previously setup will be pre-populated as well as a default Session Name created by joining the Device and User names together with a “-” for example as shown in the screen above: “lh-j”. You may choose to enter a different Session Name if you wish, such as johns-session-to-device-localhost or john-on-lh.
Then select “Next” and the final screen will be presented.
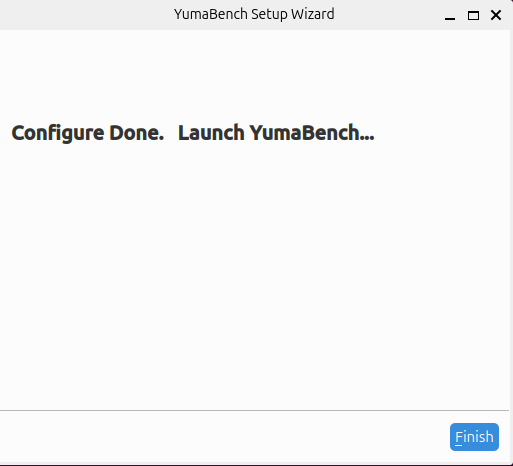
Select “Finish” to start YumaBench.
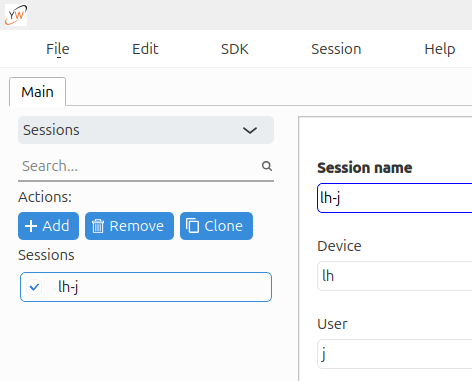
When the YumaBench Main Window starts you will see the Session that was just created by the Setup Wizard. Select the name you chose for the Session, in this example lh-j, and then select the “Start session” button located in the bottom right of the Main Window. Selecting “Start session” will open a new window, a Session Window, and connect to the Device you created with the credentials of the User you created.
The next sections of this document discuss in more detail the various aspects of YumaBench and the various screens and the data they manage.
The Main Window
YumaBench creates Sessions so that authorized Users can monitor and edit configurations of Devices. To create these Sessions YumaBench provides the user with mechanisms to create Users and Devices and then combines them into Sessions.
The YumaBench Main Window title bar contains the version number of YumaBench. This can also be found, along with other information about the YumaBench application, in Help/About.
The YumaBench Main Window is divided into 2 sections:
the left panel is used to select, create and delete items from a list of valid options, such as Users, Devices, etc.
the right panel is used to display the parameters of the selected items and allows them to be edited such as a User’s name and password
The screen can be moved and resized as usual for a graphical application. When YumaBench is next started it will retain the last size and position.
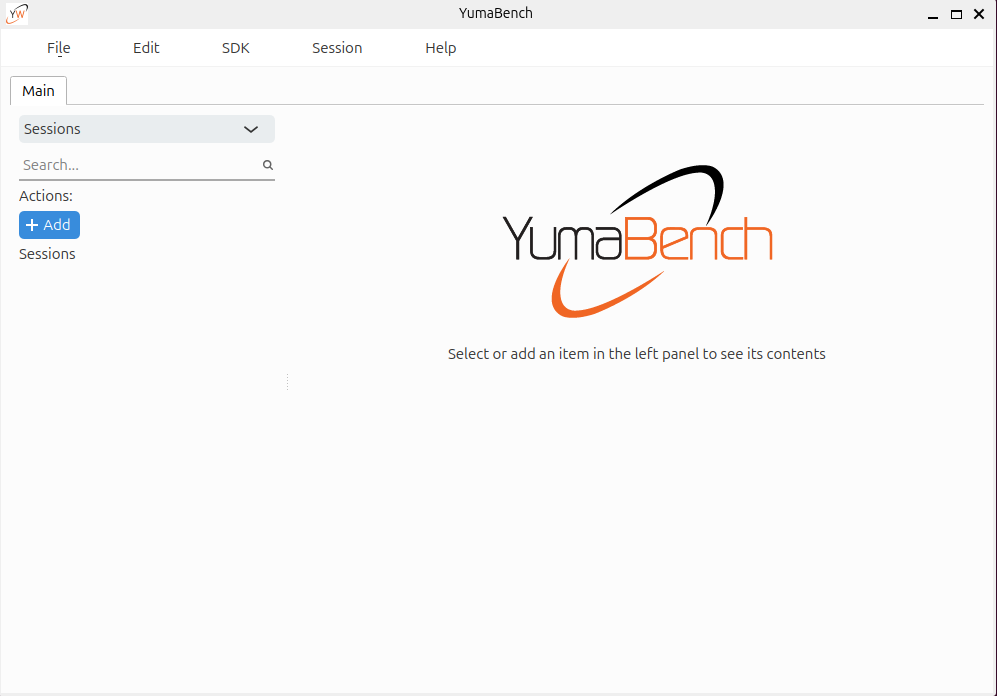
The toolbar at the top of the YumaBench Main Window has the following five pull-down menus:
File
Edit
SDK
Session
Help
Main Window - File
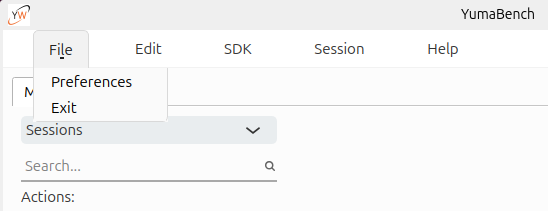
The File pull-down contains two sub-items:
Preferences -
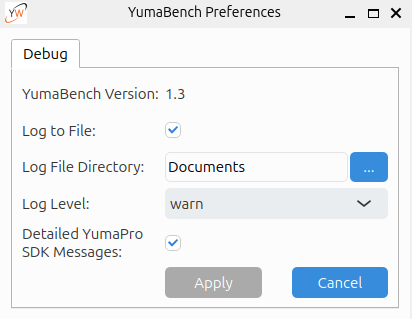
The menu displays the YumaBench version number and several items that can be configured for debugging. A full description of these items can be found in the Debugging Issues section of this manual and the --help option when running yuma-bench.
Log to File: a toggle to enable logging the debug output to a file.
Log File Directory: choosing a directory where to store the log files
Log Level: the detail level contained in the logs
Detailed YumaPro SDK Messages: a toggle to enable messages from the SDK
Exit – selecting Exit closes the application. The same action can be accomplished with selecting the “X” close button at the top right of the window
Main Window - Edit
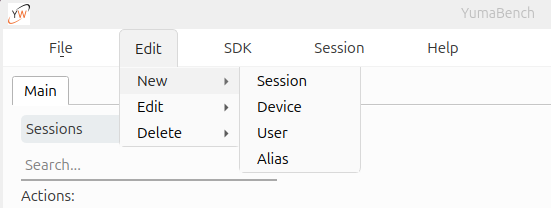
The Edit pull-down contains three sub-items:
New – contains four sub-items: Session, Device, User and Alias. Selecting one of the sub-items switches to the sub-item’s screen, creates a new item and places the cursor in the right panel to start editing the new item’s parameters
Edit – contains four sub-items: Session, Device, User and Alias. Hovering the mouse pointer over one of the sub-items displays the instances of the selected sub-item, i.e. if you hover over User the menu will display all defined Users. Selecting one of the Users switches to the Users screen and places the cursor in the right panel to start editing the selected User information
Delete – contains four sub-items: Session, Device, User and Alias. Hovering the mouse pointer over one of the sub-items displays the instances of the selected sub-item, i.e. if you hover over Device the menu will display all defined Devices. Selecting one of the Devices switches to the Devices screen and deletes the selected Device
Main Window – SDK
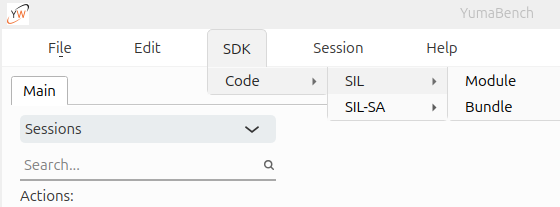
The SDK pull-down contains one sub-item:
Code – contains options for developing Server Instrumentation Library code using the YumaPro SDK. Code contains two sub-items: SIL and SIL-SA. Hovering the mouse pointer over the SIL or SIL-SA sub-items displays two further sub-items: Module and Bundle. Selecting one of these displays the Creator window for that instance. For example: selecting SDK, then Code, then SIL and then Module brings up the SIL Module Creator window.
For details of the SIL and SIL-SA Creator windows for Modules and Bundles see section: YANG Development
Main Window - Session
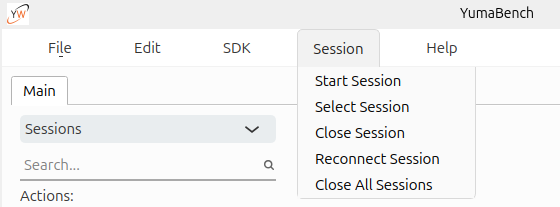
The Session pull-down contains five sub-items:
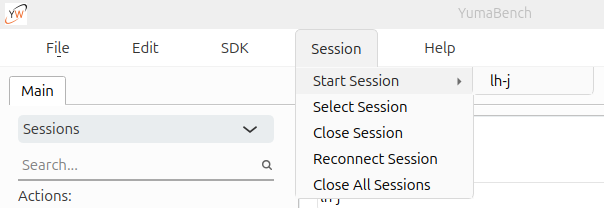
Start Session – hovering the mouse pointer over Start Session displays all defined sessions as a sub-menu. Selecting one of the sessions opens up the Session Window and attempts to connect the session’s defined User to the Device.
Note
Selecting a Session more than once opens a new Session Window for each selection. Each Session Window displays the session number in the title bar and the user name in the top right of the window.
Select Session – if there are no sessions active, Select Session does not display a sub-menu and there is nothing to select. If there are sessions open then the sub-menu displays all sessions. Selecting one of the sessions brings the selected Session Window to the foreground
Close Session – if there are no sessions active Close Session does not display a sub-menu and there is nothing to select. If there are sessions open then the sub-menu displays all sessions. Selecting one of the sessions closes the selected session and the Session Window is closed
Reconnect Session – if all sessions Windows are connected to their session, Reconnect Session does not display a sub-menu and there is nothing to select. If there are sessions that are disconnected then the sub-menu displays all disconnected sessions. Selecting one of the sessions tries to re-connect the selected Session
Close All Sessions – closes all open Session Windows and their sessions
Main Window - Help
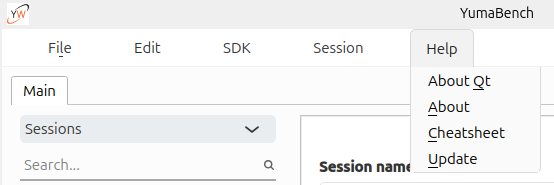
The Help pull-down contains four sub-items:
About Qt – displays information about the Qt program used by the YumaBench Graphical User Interface
About – displays information about the YumaBench Graphical User Interface including the version number
Cheatsheet – displays information about what the font type and color used in a window denote
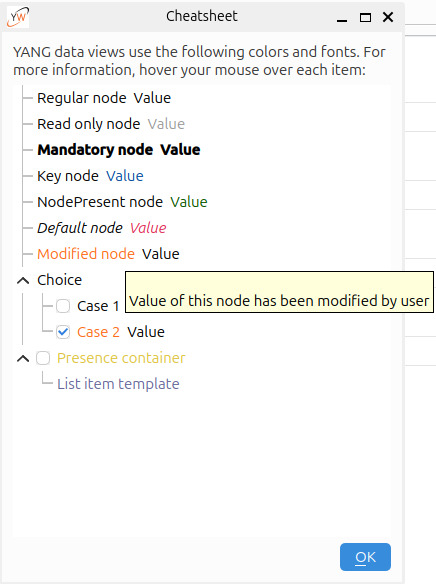
Hovering over an item provides a popup menu containing help text, as shown above for the Help menu’s Cheatsheet.
Update – displays if YumaBench is up to date and if not asks if a update should be performed
Note
For MacOS you will need to Exit YumaBench and restart the application for the updated version to take effect.
Main Window – Select Item Types
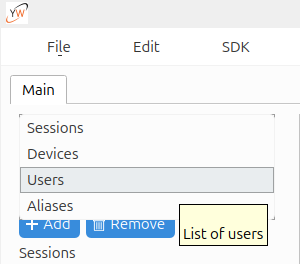
On the left side of the YumaBench Main Window is a list of one or more items. The type of items is selected by the pull down menu at the top. The pull down contains four types:
Sessions – manage Sessions made up of Users and Devices
Devices – manage Devices made up of names and IP addresses
Users – manage Users made up of names and credentials
Aliases – manage command aliases
To expedite getting started we will initially describe setting up one User, one Device and one Session and leave managing multiple items until a later section.
Users
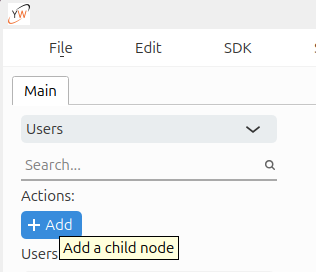
To create a new User select the “+ Add” button. This is the same as selecting Edit/New/User from the Main Window tool bar.
The right side of the Main Window will display the data entry section to enter the parameters for the User.
The cursor will be placed in the “User Name” field in the data entry section.
Note
Password is not mandatory as it is permissible to have a Device with no password required.
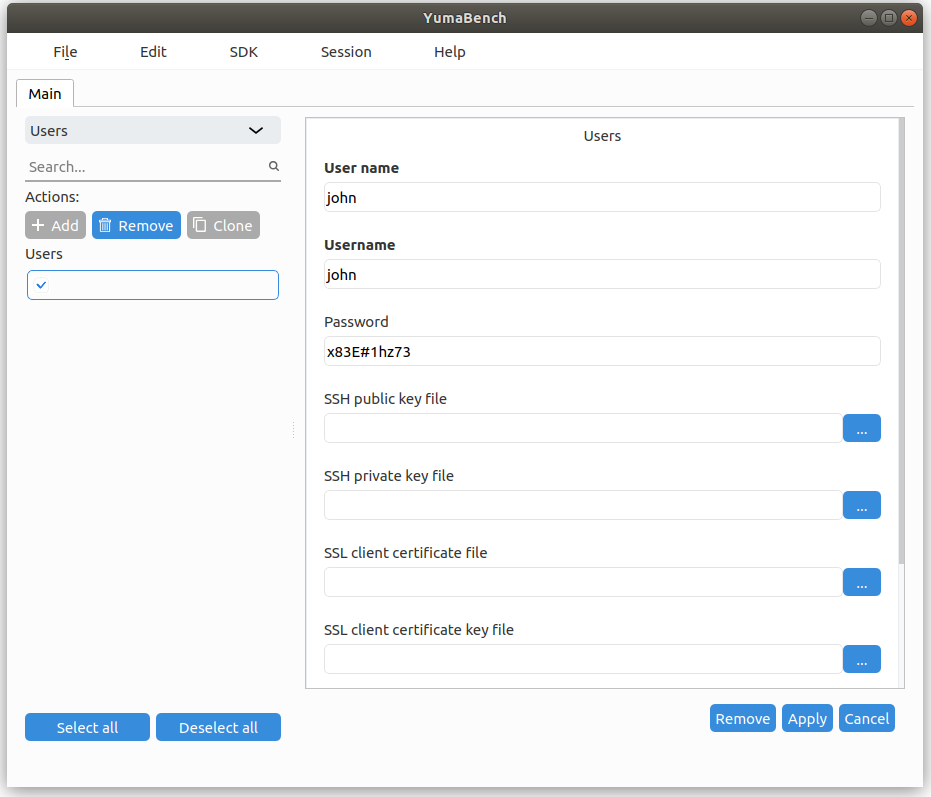
Once you have entered: User name, Username and optionally Password, select “Apply” to create this User.
The “User name” is now added to the list of items on the left side of the Main Window.
User configured with SSH Keys
To use SSH keys to connect to the server setup your certificates and configuration using the instructions found in Installing SSH keys
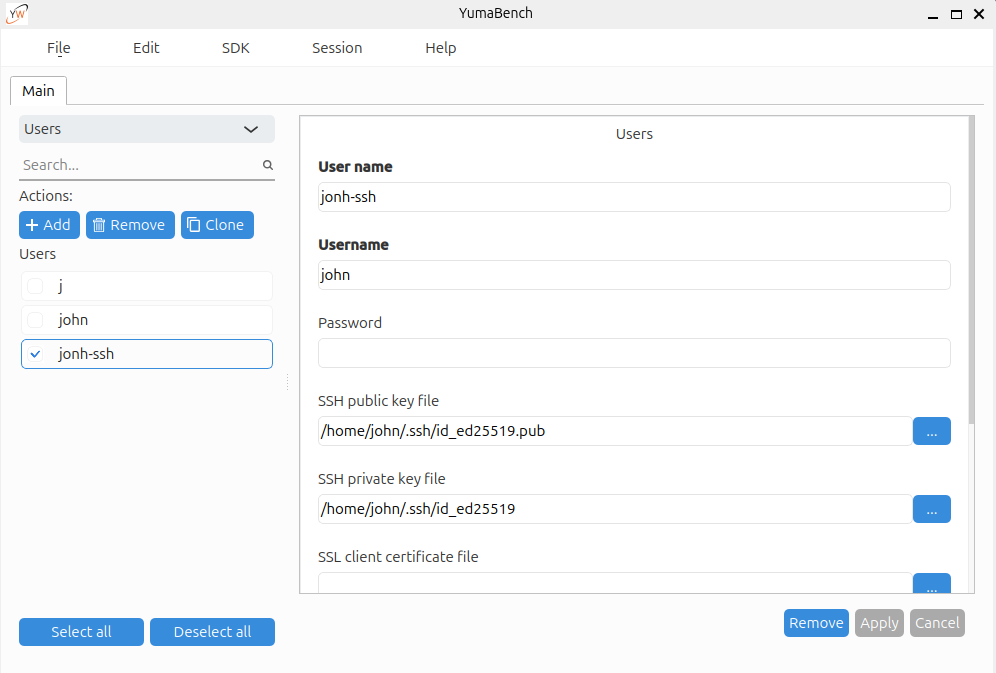
Then setup a User and fill in the “SSH public key file” and “SSH private key”. When you select “...” to the right of the field for the keys a popup with a file explorer with appear looking something like the following:
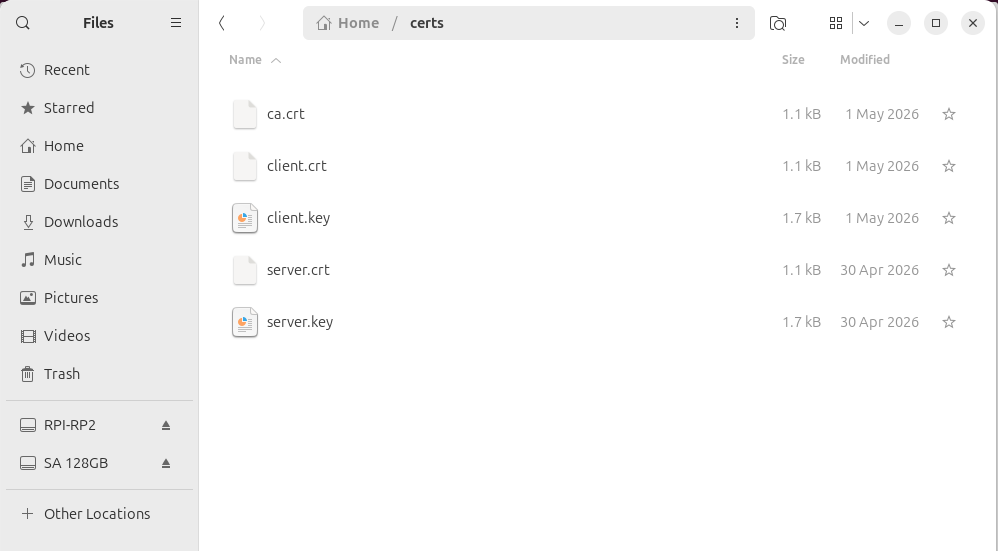
The completed SSH keys should look something like the User configured below:
Warning
If you created your SSH keys with a pass-phrase you will need to supply the pass-phrase in the Password: entry for the User.
User configured with SSL Certificates
To use TLS to connect to the server setup your certificates and configuration using the instructions found in Configure TLS.
Then setup a User with the certificates. It should look something like the User configured below:
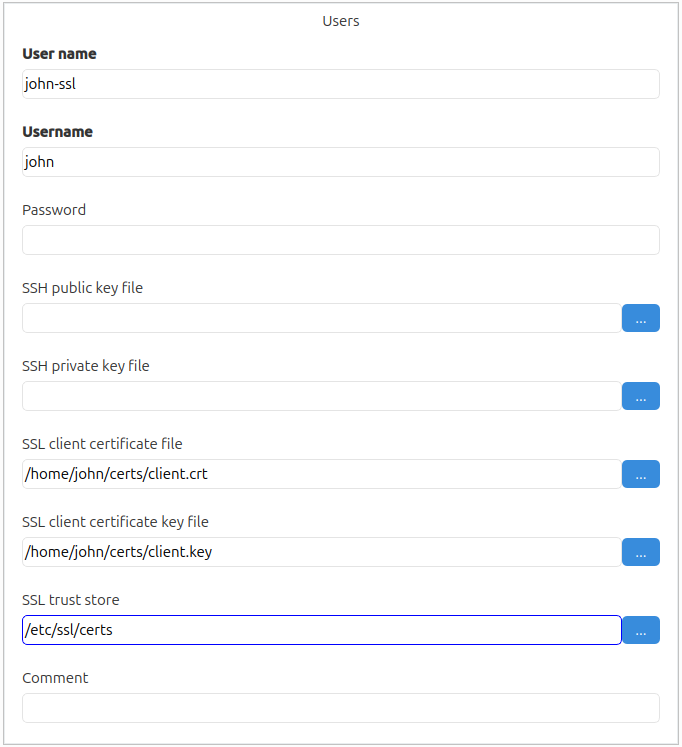
To setup a Device to use TLS, see below, and then create a Session that uses this User and the TLS configured Device.
Devices
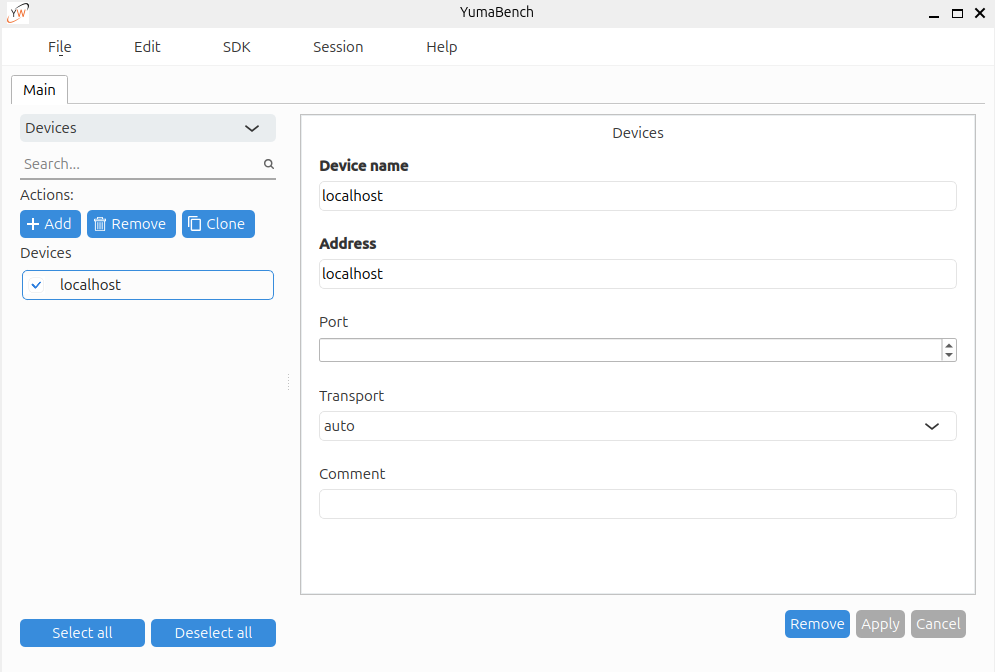
Similarly + Add a Device to connect to with the User that was created in the previous step. The Device needs a “Device name” and an Address which can be a regular IP address or a DNS recognized name. Optionally a Port can be supplied that will be used to connect to the Device’s NETCONF server and a Transport can be set.
When the relevant information is added select the Apply button.
If you decide you don’t want the new item or you want to enter its parameters from scratch you can select the Cancel button before selecting Apply or the right side Remove button after you select Apply to remove this new item.
Device configured for TLS
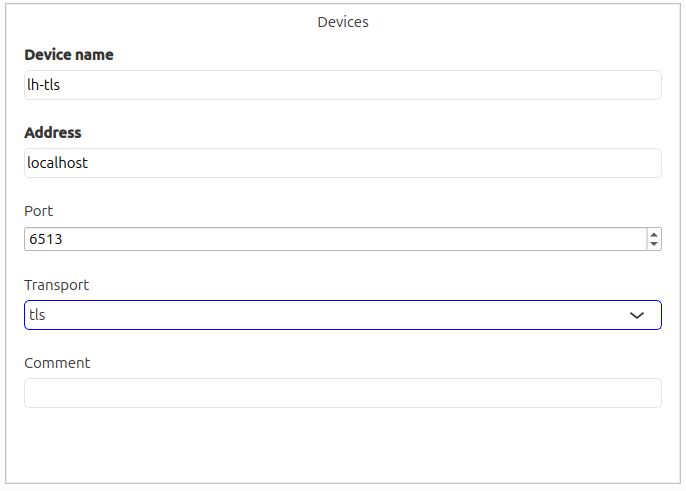
If you need to use TLS to connect to the server and you have used the instructions found in Configure TLS, setup a device using Port 6513 and Transport tls. You can select tls from the pull down menu. It should look something like:
NETCONF Sessions
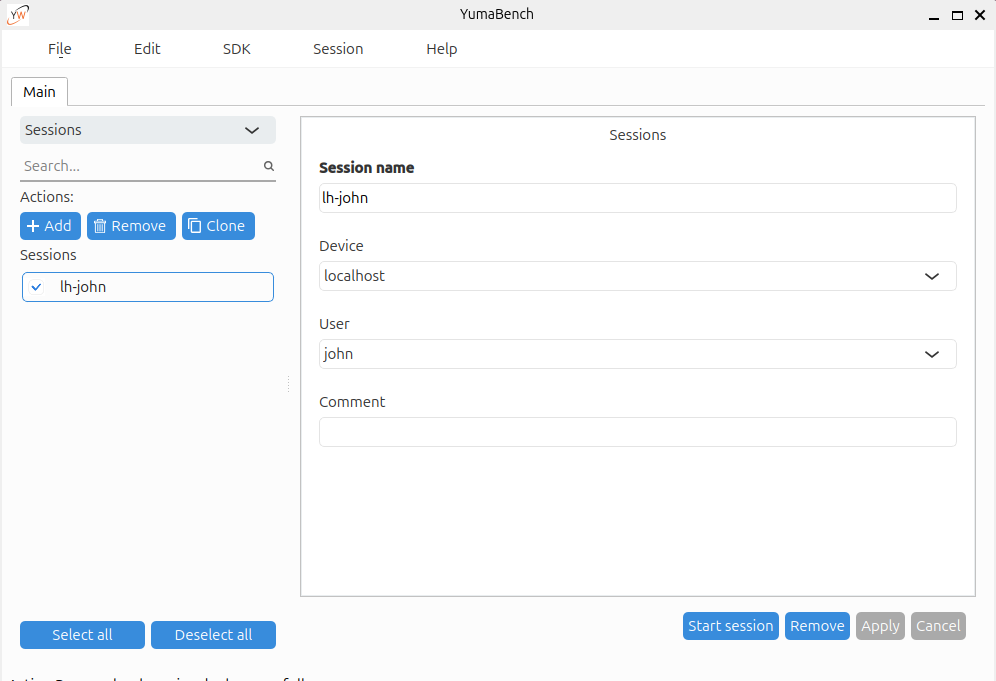
Lastly + Add a Session. A Session consists of the Device where the NETCONF server is located and a User that has credentials that allow access to the Device. The parameters required to create a Session are listed on the right side of the screen. Device and User default to the available values if only one has been created.
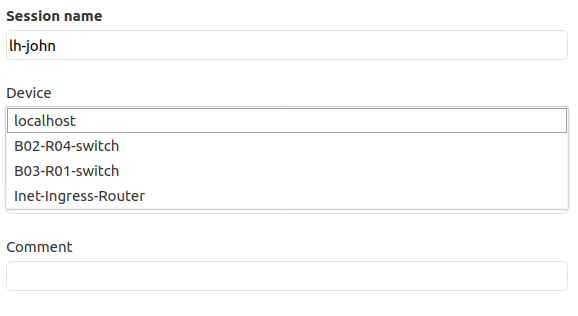
If multiple Users or Devices have been created then the User and /or Device entry fields provides a selectable pull down menu listing the options as shown above.
When the Device and User are set to their desired values select Apply to create the Session.
Starting a Session
If you are using the YumaPro netconfd-pro server, start the server from a terminal window with:
netconfd-pro --log-level=debug4 --access-control=off --factory-startup --no-config
Warning
The --access-control=off option disables NACM enforcement.
Use it only for evaluation or debugging, and use caution when
enabling it.
In YumaBench’s Main Window if the desired Session is highlighted select the “Start session” button. Alternatively select Session/Start Session/lh-jh from the Main Window tool bar.
The lh-jh Session Window should open up and look something like:
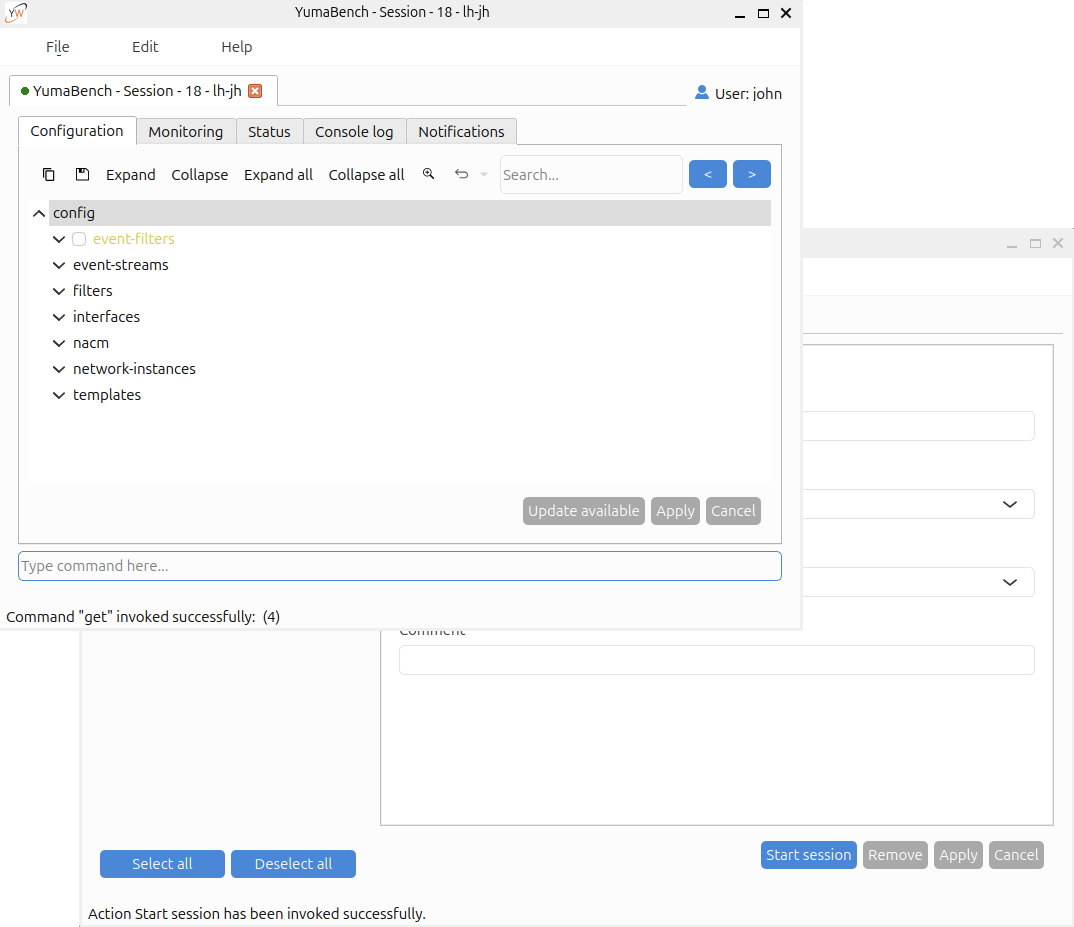
The title bar for the Session window contains the Session number and the Session name.
Re-selecting “Start session” again opens a new Session window with a new session, and new session number, to the same server.
Using Aliases
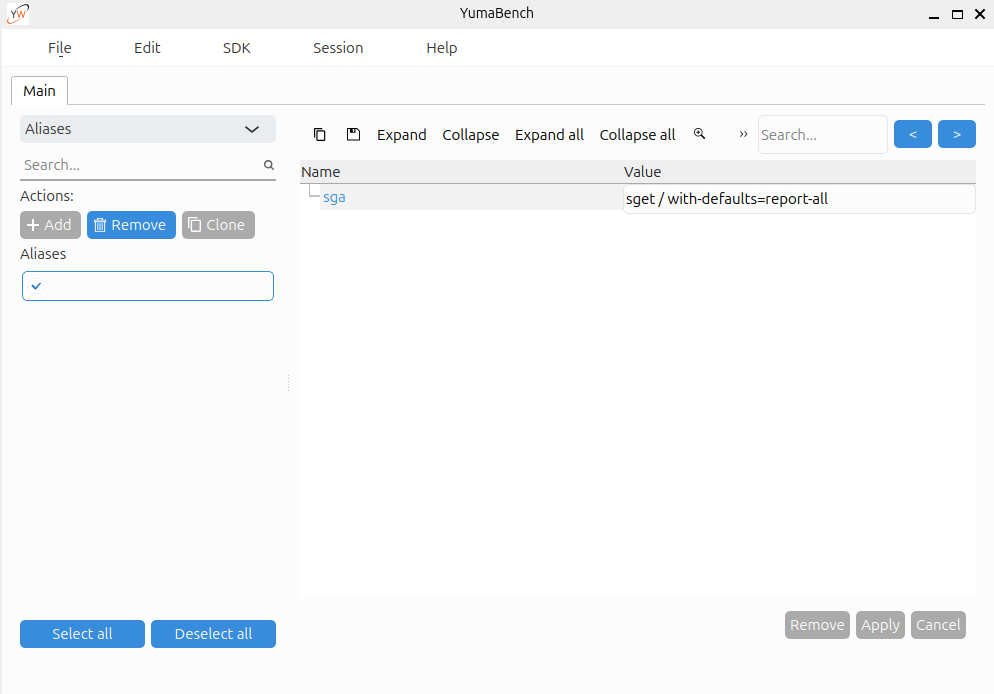
This menu allows creating and managing command aliases. Creating an alias consists of the name you choose for the alias and the value of the alias. The example above sets sga=”sget / with-defaults=report-all”. In any active session “sga” can be typed in the command prompt area and acts exactly as if ”sget / with-defaults=report-all” had been typed (without the quotes).
All aliases apply to all open Session Windows.
Cloning List Entries
Multiple list entries can all be individually create using the “+ Add” button. If you have many list items that are primarily the same with only minor differences you can clone the list entries.
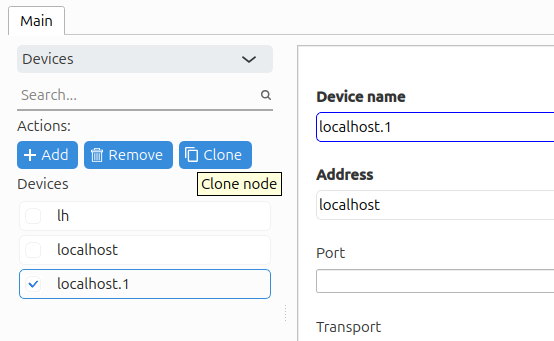
The Clone button makes an exact copy of the one or more selected list entries. All the information is copied and the “Device name” has a “.1” available instance is created. For example, if name, name.1, name.2, and name.3 already exist and you select name and then select Clone, name.4 will be created. If you now Remove name.2 and select name.4 and then select Clone name.2 will be created.
When an item is Cloned it is automatically created so you do not need to select Apply.
Selecting List Entries
If an item on the left side on the Main Window is selected the right side of the Main Window displays its details. There are two buttons are the bottom of the left side:
Select all
Deselect all
Depending which is selected either all the items are selected or all are deselected. The right side of the Main Window displays the list items details in a list if all the items are selected. If “Deselect all” is selected then no items are displayed and the screen reverts to its initial state and the YumaBench logo splash screen is displayed.
Each item in the list on the left side of the Main Menu has a radio button so that an arbitrary set of items can be selected and displayed as shown below:
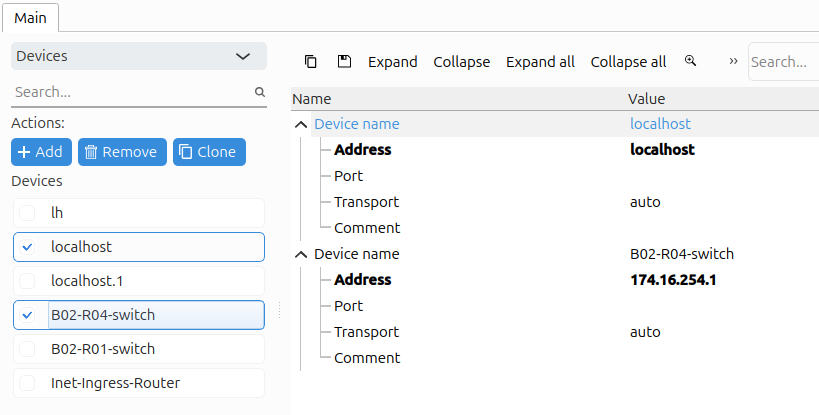
As you can see from the screen shot above two Devices are selected in the list view on the left side and their details are displayed on the right side. Only 1 Device’s details, the top one, is selected on the right side. You can use your mouse to select other Device details. If you select the Remove button on the right side it deletes the Devices that are selected in the right side pane. If you select the Remove button above the Device’s list on the left side it deletes the Devices that are selected in the list.
Warning
If a Session is currently running and it uses a specific User or Device you will not be able to Remove either in use User or Device until the Session has finished. The Remove buttons will be greyed out until the Session ends.
Expand, Collapse and Zoom
Above the Device parameters being displayed on the right side of the screen there are several buttons:
Expand - expand (open up) the display of the selected node(s)
Collapse - collapse (close) the display of the selected node(s)
Expand all - expand (open up) the display of all nodes
Collapse all - collapse (close) the display of all nodes
Note
Depending on the size of the Main Window some, or all, of the buttons mentioned above may be hidden under the “>>”, indicating ”more”, symbol on the right of the buttons.
Searching for Data
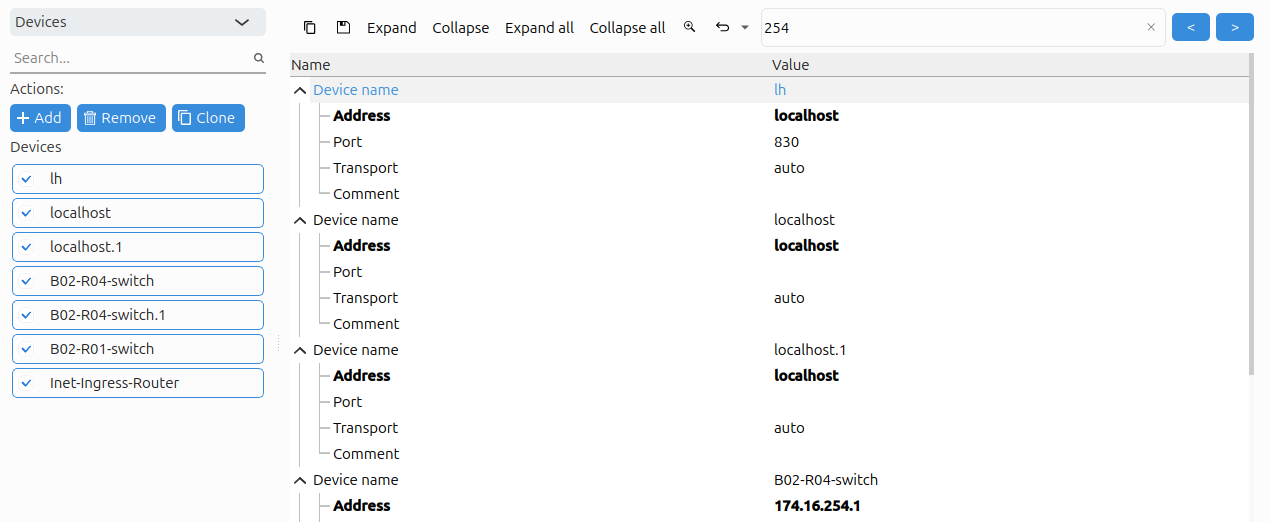
To the right of the Expand and Collapse buttons is a rectangular input box and two buttons < and >. This is the search function. You can enter the text you want to search for which can be the displayed name of the item or anything in the parameters such as the IP address or part of it. Selecting < or > searches backwards or forwards. The search is conducted in the selected items only. If the text is found inside a collapsed node the node will be expanded and the cursor will highlight the found item.
The Session Window
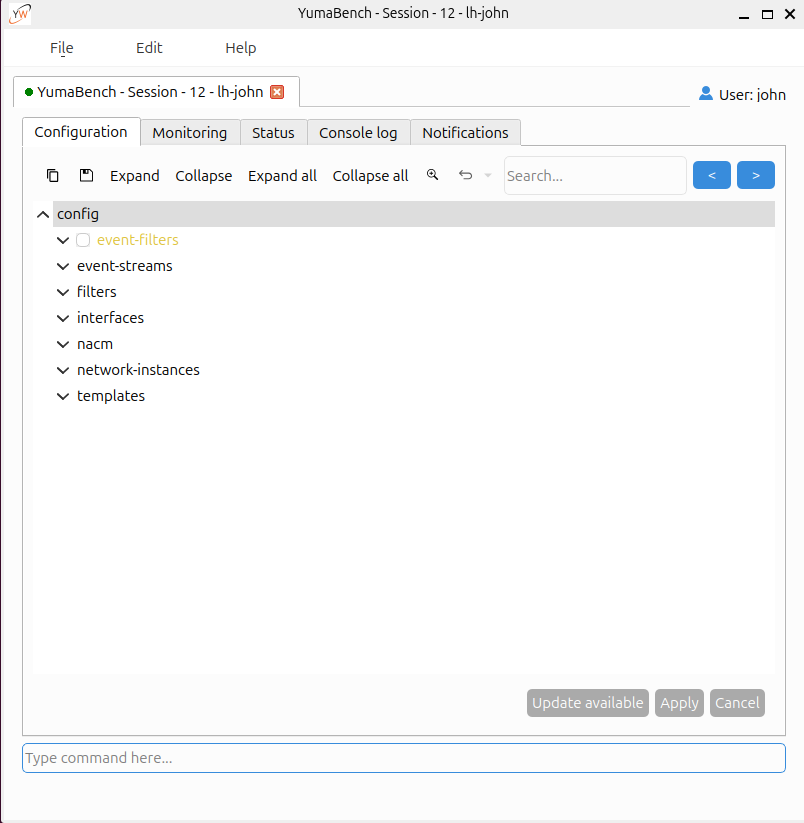
When the Session window starts up it connect to the server specified in the Device and with the credentials specified in the User used to create the Session in the Main Menu. The dot in the left of the tab for the Session will turn green indicating it has successfully connected to the server. The Session then requests the configuration from the server.
The toolbar at the top of the YumaBench Session Window has the following three pull-down menus:
File
Edit
Help
Session Window – File
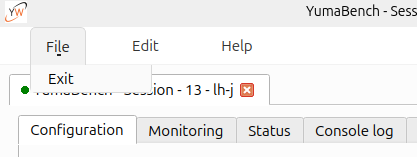
The File pull-down contains one sub-item:
Exit – selecting Exit closes the Session window but not the Main Menu. The same action can be accomplished with selecting the “X” close button at the top right of the window
Session Window – Edit
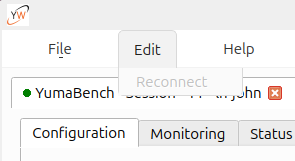
The Edit pull-down contains one sub-item:
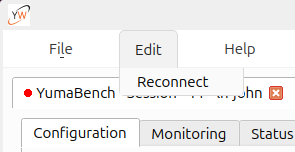
Reconnect – this will be grayed out and not selectable when the Session window is connected normally to the server. Should the server connection be lost for whatever reason the Reconnect option will become available to try and reconnect with the server. When the connection is broken the green dot on the left of the Session tab turns from green to red (see screen shot below)
Session Window – Help
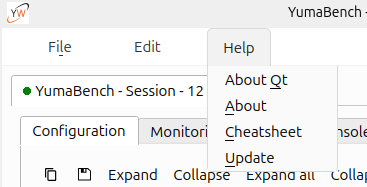
The Help pull-down contains three sub-items and is the same as the one in the Main Menu:
About Qt – displays information about the Qt program used by the YumaBench Graphical User Interface
About – displays information about the YumaBench Graphical User Interface
Cheatsheet – displays information about what the font type and color used in a window denote
The Session Window – Tabs
The Session window consists of five Tabs that categorize the different aspects of a NETCONF Session with a server:
Configuration – view and manage the server’s YANG configuration
Monitoring – display the server’s telemetry data
Status – displays the ongoing status of the Session
Console log – displays the Session messages and allows provides a command line interface
Notifications – displays the notifications from the server
tab: Configuration
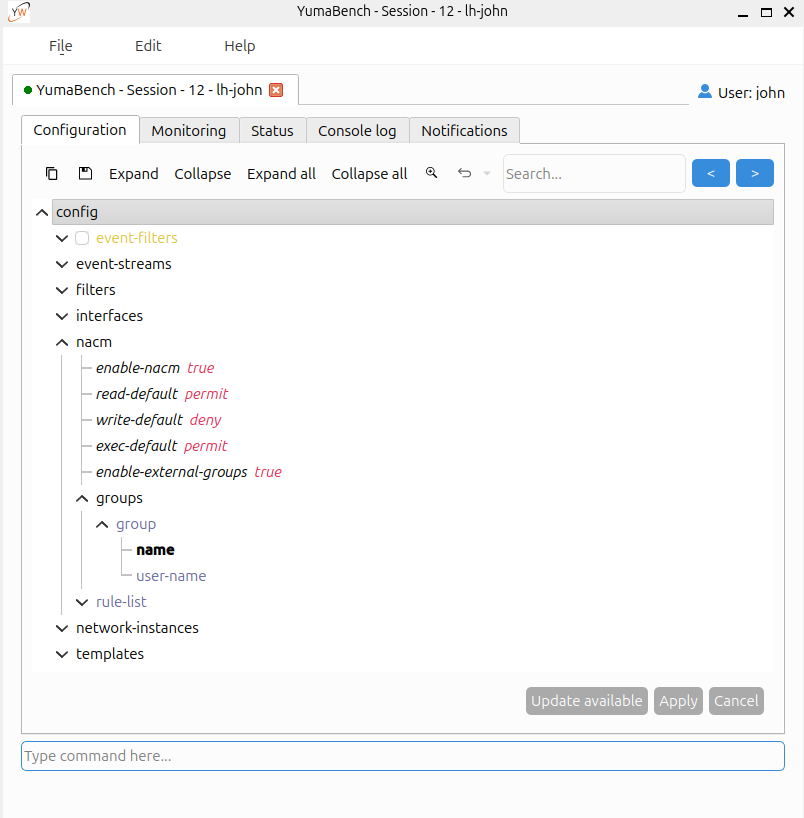
The Configuration tab displays the server’s YANG configuration as a tree and allows the user to edit the configuration.
Navigating Data Trees
YumaBench data trees are displayed with the common practice of having a “v” to the left of a node denote that the node contains sub-nodes. Those sub-nodes may themselves have sub-nodes. Selecting the “v” expands the node to display the next level of sub-nodes. Similarly a “^” to the left of a node indicates that the sub-sub-nodes are being displayed and selecting the “^” collapses the display of the node.
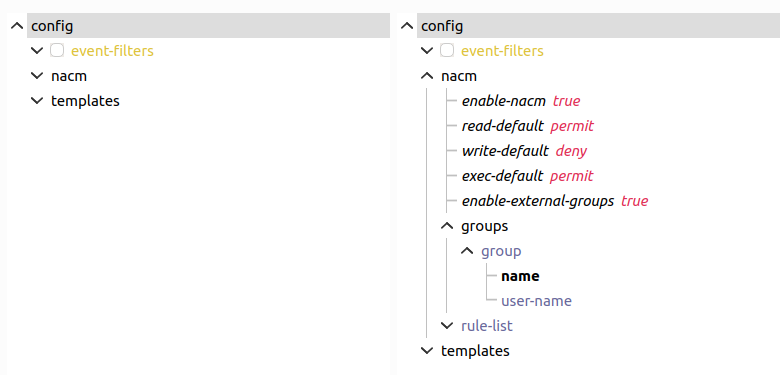
In addition to the individual node controls of “^” and “v” there are also the buttons at the to of the tree display:

If a node is selected and then the above buttons are selected:
Expand – will expand the display of all the sub-nodes of the node selected
Collapse – closes all the sub-nodes and leaves the display with just the selected node
Expand all – will expand and display all the nodes of the configuration tree
Collapse all – closes all the nodes and leave the display with just the config node
Editing Configuration
To introduce editing in YumaBench we will create a group in the NACM groups list. Open the NACM node, then open “groups” and then “group”. The display should look something like the screen above.
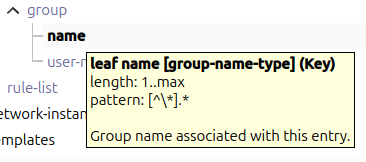
Select the “name” node. If you pause your cursor over a node a help “hover over” popup menu appears and provides information on that node such as the type of node, the values that the node can be set and the node’s description.
Select the “name” input field to the right of the node and enter a name for this new “group”. You will notice that the path to the node “name”, that is config/nacm/groups/group, have all changed color. This indicates that this path to the node “name” has been modified. Notice that the Apply and Cancel button are now available as there is something that can be Applied or the whole edit can be Canceled.
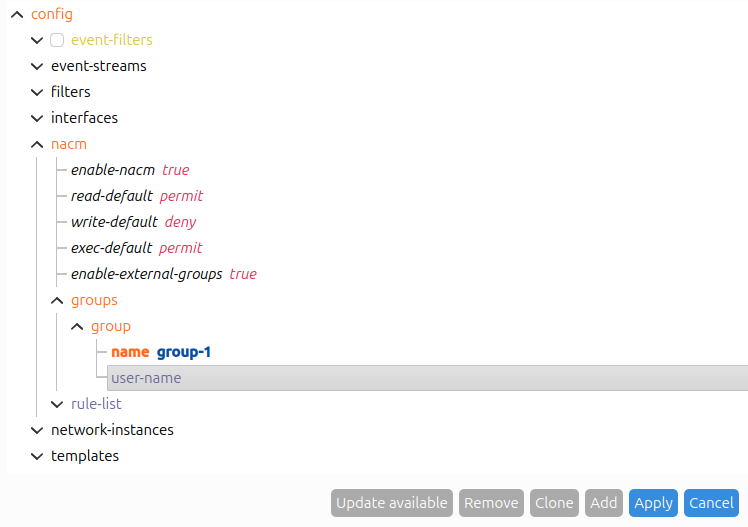
If you select the Session Window’s Help/Cheatsheet it shows what different colors means and also that bold means the node, in this case “name”, is mandatory. Mandatory is a YANG attribute that means this node must be specified for the “group” to be valid. The associated “user-name” is optional. Finish typing in a “group” “name” and a “user-name”.
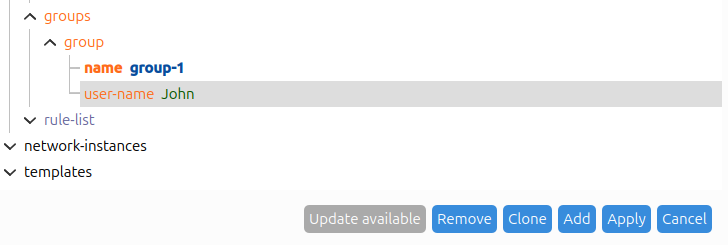
Now select Apply.
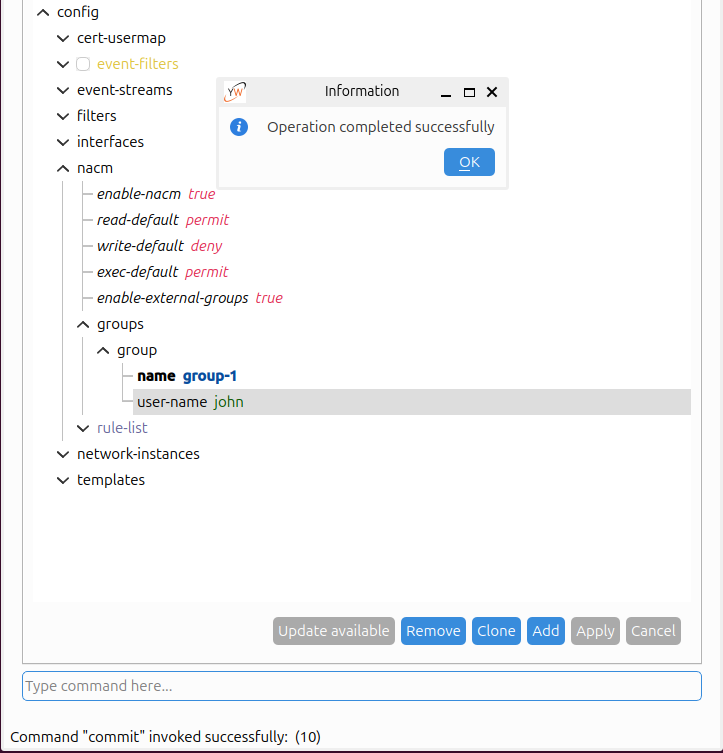
The Apply should be successful and you now have your first configuration change applied to the server.
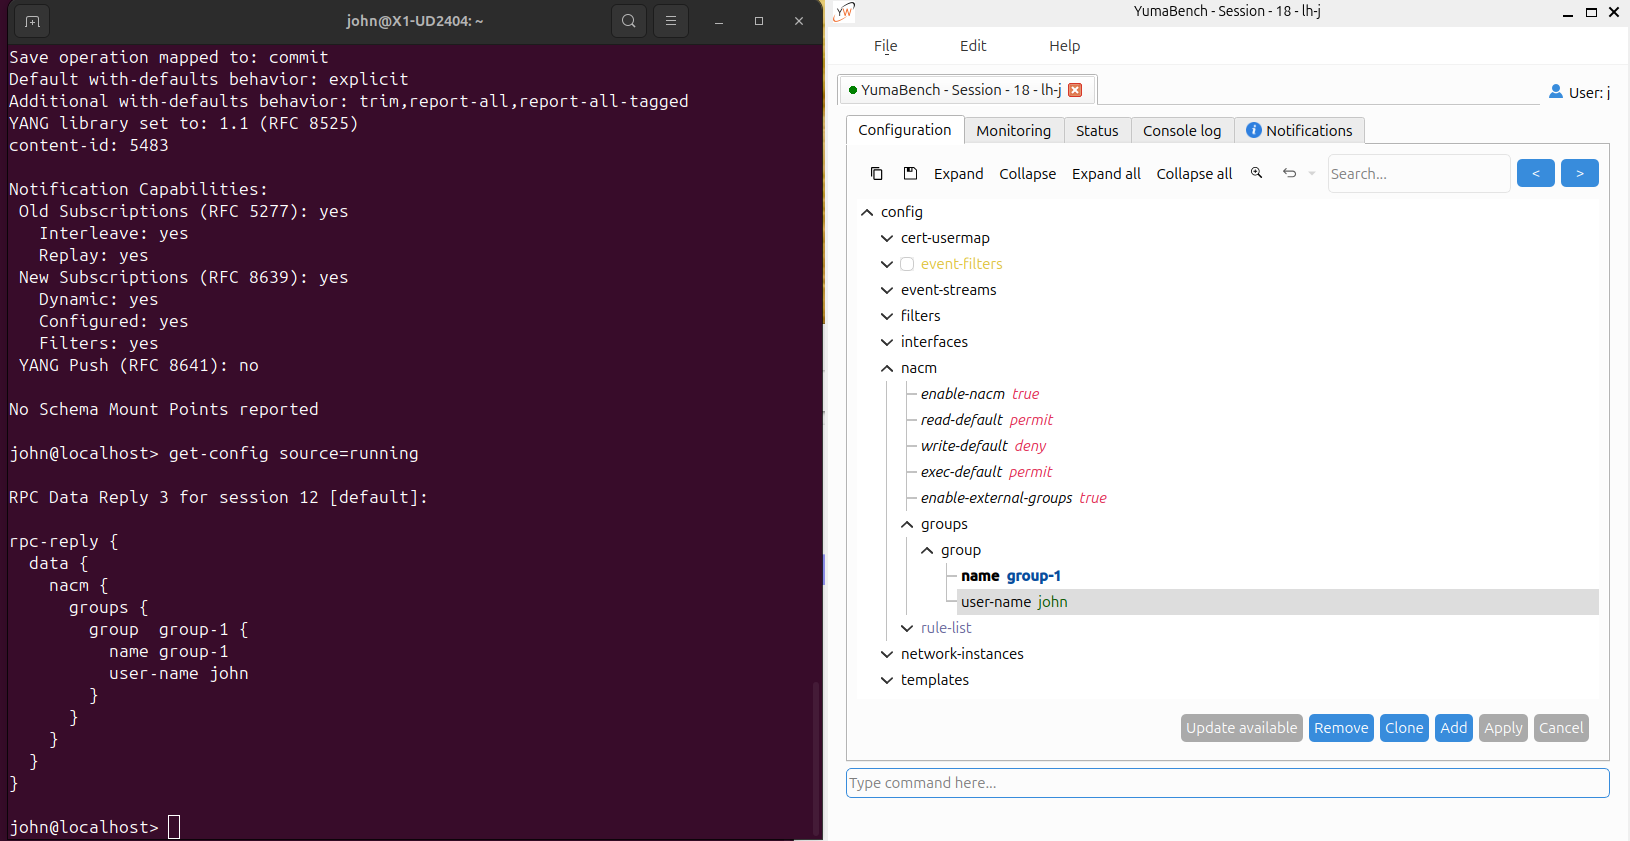
If you run yangcli-pro and connect to the same server as the YumaBench Session you can see that this configuration has been applied.
Node Creation and Removal
At the bottom of the configuration data display there are several buttons. The screen above shows the display after a configuration edit just added a NACM group with a successful Apply. There are three buttons highlighted. These can Remove the current node, clone the current node with a copy of the data or add another blank template group to the end of the list which will be ready to fill in.
These buttons change depending on the context of what is displayed and what is selected:

Update available – indicates that the configuration on the server has changed from the current content displayed in the tab. This would be caused by another Session to the server changing the configuration. Selecting “Update available” retrieves and displays the new configuration
Warning
NOTE:This action may erase data that is in the middle of being edited.
Remove - the currently selected node
Clone - the currently selected node, copying the data and appending a .1 to the node name, its key. If there is already another name with .1 the next available number is used
Add - a sibling node to the end of the list of the currently selected node
Add below - add a sibling node after the currently selected node in the user ordered list
Add above - add a sibling node before the currently selected node in the user ordered list
Apply – the current changes
Cancel – discard the current edited data
Warning
NOTE:Currently anydata and anyxml are not supported. They will be displayed but are not editable.
tab: Monitoring
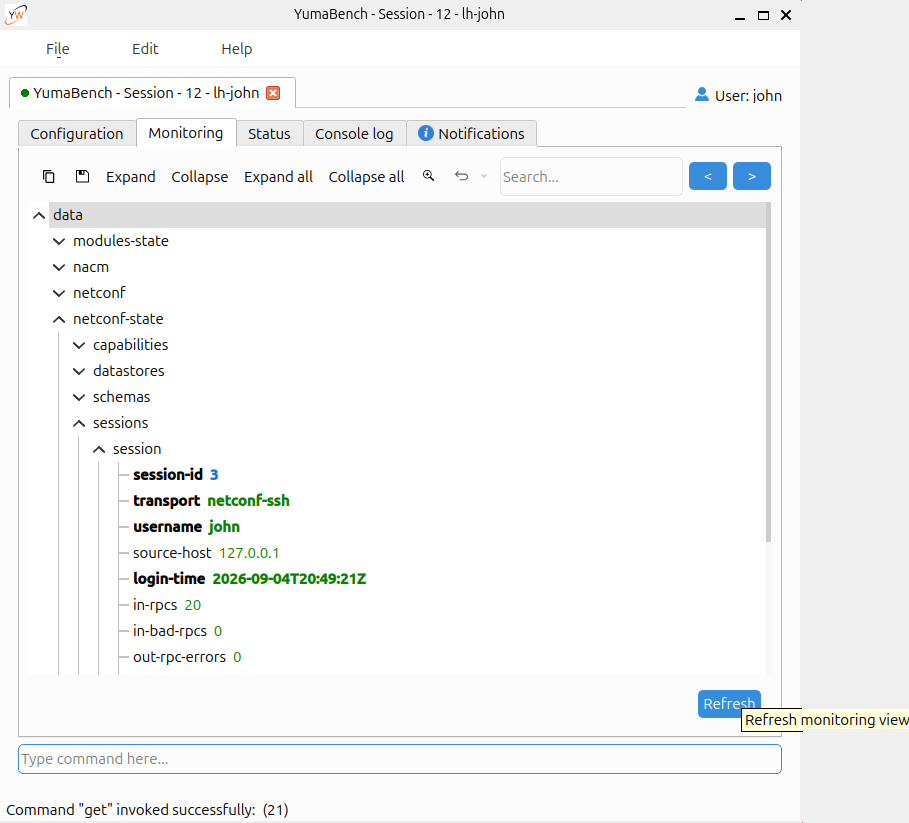
The Monitoring tab displays the telemetry data from the server, that is YANG data marked “config false”.
There is one button in the bottom right: Refresh which initiates a request for the telemetry data from the server. If you open up the netconf-state/sessions/session and select Refresh you can see the in-rpcs count increment with each Refresh. Other data in your YANG model such as interface counts would most likely increment more rapidly.
In the “Type command here...” you can issue a command and the telemetry parts of the result will be displayed. The Monitoring tab will display the response to commands typed in to any command line entry box, such as the one on this tab and also the ones on the Configuration tab and the Console tab.
For example typing in: sget /nacm with-defaults=report-all will display the NACM data node including the defaults.
Note
To customize your data view you can use expand or zoom into specific areas see the Configuration tab section on Navigating Data Trees.
tab: Status
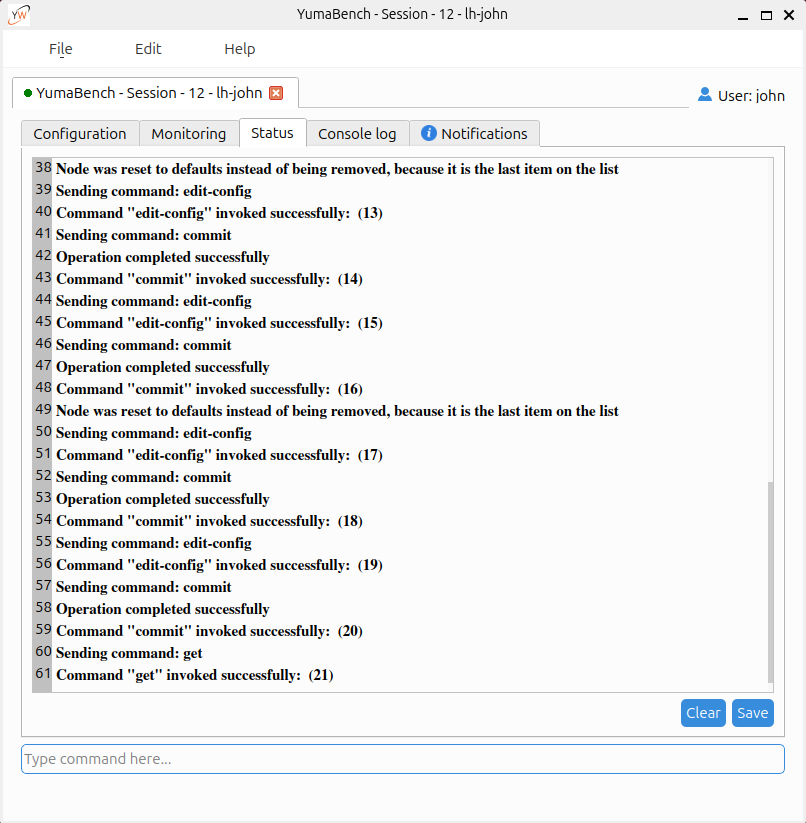
The Status tab displays the ongoing status of the Session, the status of each message sent and the status of communications with the server. In the above screen shot you can see the status of multiple messages and then near the bottom the connection with the server is lost. Reconnection is attempted (manually selecting Edit/Reconnect) and succeeds.
tab: Console log
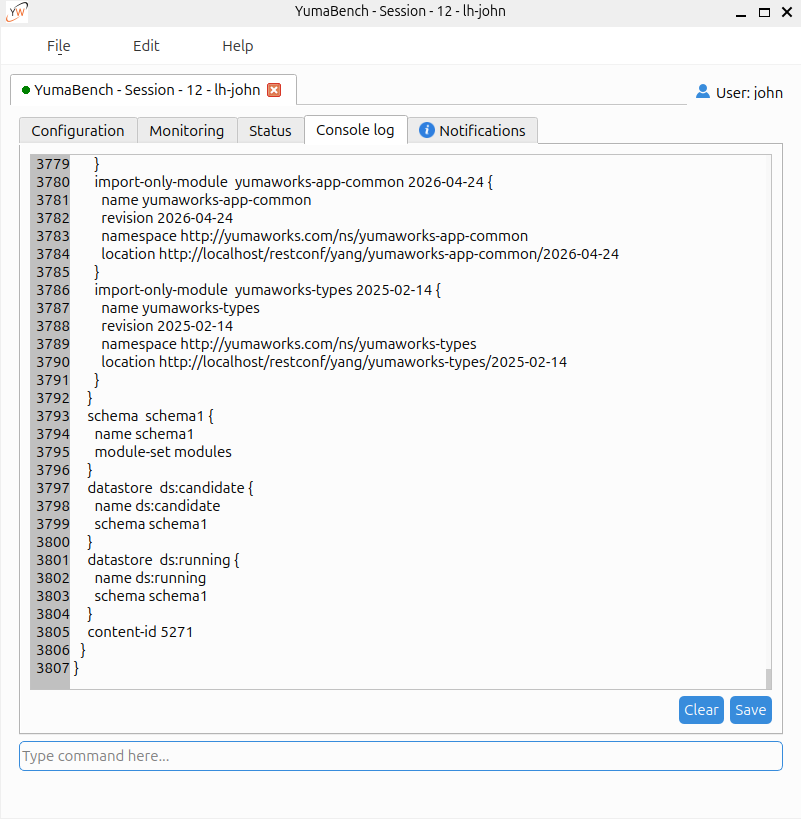
The Console tab displays the content of the messages between the Session window and the server. Each line of the messages is displayed with a line number. There are two buttons at the bottom right of the window:
Clear – clears the screen/buffer of all messages
Save – saves all the currently displayed messages to a text file. The file name and location is requested
The Console tab also allows the user to enter commands in the command entry box at the bottom of the screen. Command completion works the same way as YumaPro SDK’s client yangcli-pro:
<Tab> by itself – displays possible commands
text<Tab> - displays
a list of possible completions if there are multiple completions
“No known completions” if the text is unknown
completes the text, for example “sget /na<Tab>” become “sget /nacm”
Below are some examples of completions where <Tab> is entered after the screen cursor “|”:
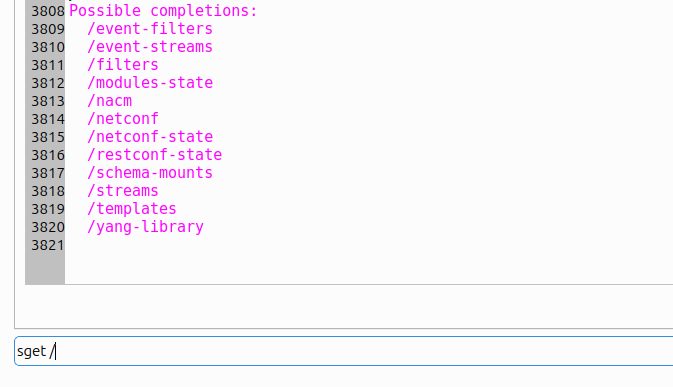
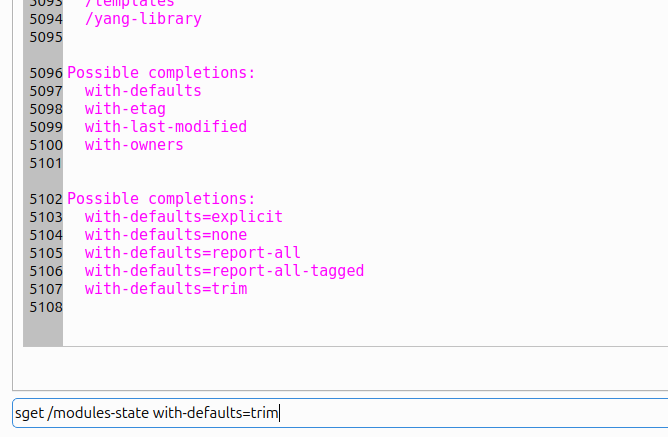
The Configuration and Monitoring tabs also have a command entry box. While they both have command completion they do not display “Possible completion:” lists.
tab: Notifications
When the Session window starts up and connects to the designated server it also creates a subscription with the server for all server notifications. The server notifications are displayed in the Notification tab.
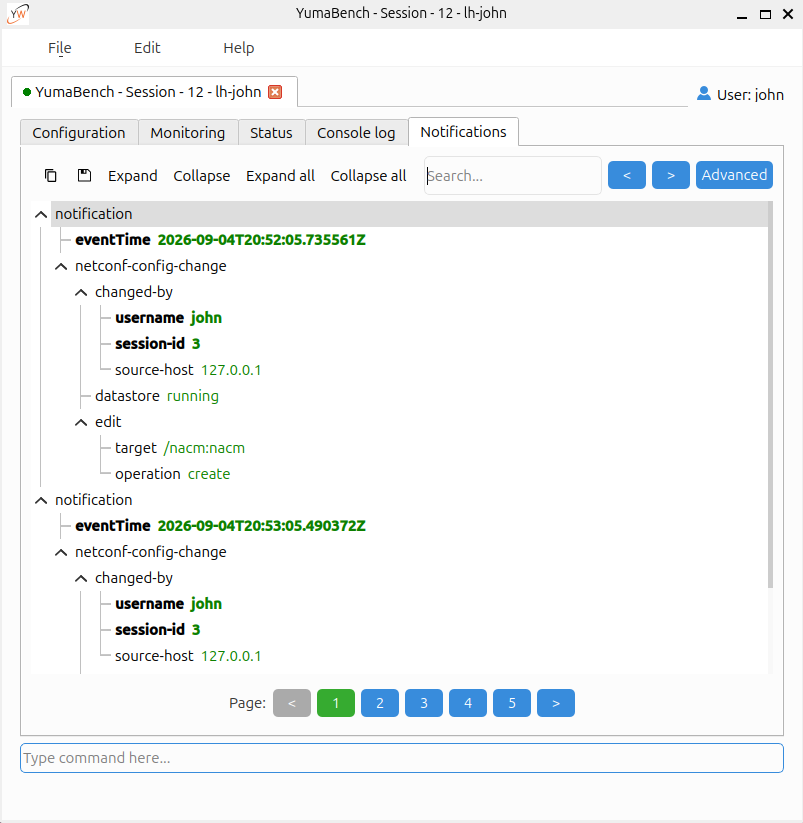
The notifications are displayed in pages.
Above the displayed notifications there are several buttons:
Copy – the selected notification to the clipboard
Save – save the selected notification to a file. The default extension is .xml. Other extensions and the location of the file can be specified
Expand – expand (open up) the display of the selected node(s)
Collapse – collapse (close) the display of the selected node(s)
Expand all – expand (open up) the display of all nodes
Collapse all – collapse (close) the display of all nodes
At the bottom of the display there are several buttons:
< – select to view previous page (valid only when page 2 or higher is being displayed)
1,2,3… – the page number being displayed indicated in green. Other pages can be selected
> – select to view next page (valid only if not displaying the last page)
Searching Notification Data
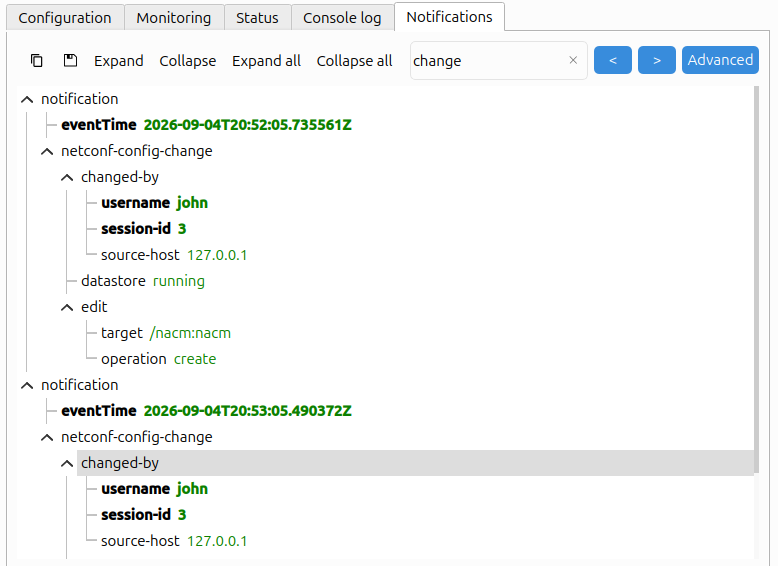
To the right of the Expand and Collapse buttons is a rectangular input box and two buttons < and >. This is the search function. You can enter the text you want to search for in the notifications. Selecting < or > searches backwards or forwards. The search is conducted in the selected notifications only.
Advanced Filtering for Notifications
The Notifications displayed can be filtered by time and type.
Selecting the Advanced button to the right of the Expand and Collapse buttons displays the popup window below.
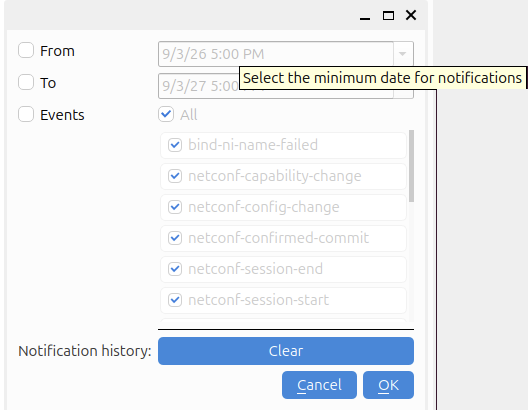
The filter option fields are:
From – specifies the time for the first Notification that is displayed. If this is not enabled, the default, then the notification are displayed from the first notification that the Session window received
To – specifies the time for the last Notification that is displayed. If this is not enabled, the default, then the notification are displayed up till the latest notification that the Session window has received
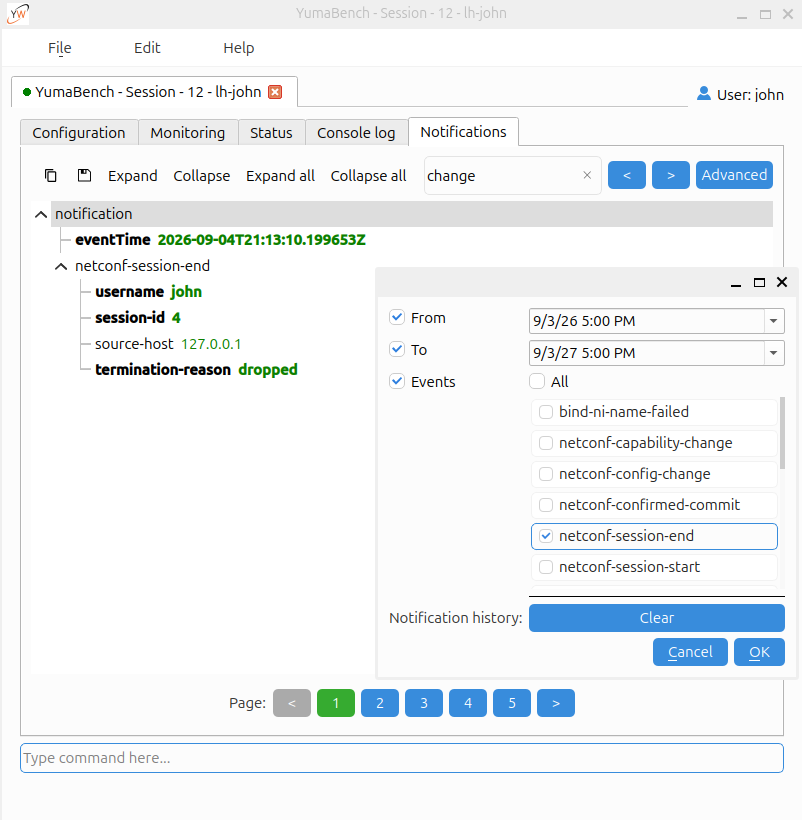
Events – if this is enabled the list of Notification event types is displayed. Initially all event types are displayed, that is they are all checked/enabled. Event types can be individually selected. There is also an “All” radio button that toggles between selecting all even types or selecting no event types to be displayed
The screen below shows an example of the From, To and Events fields:
At the bottom of the Advanced widow contains three buttons:
OK – enable the filters that were selected
Cancel – does not enable any of the changes to the filtering and closes the Advanced window. Changes made to the filters are retained but not implemented
Clear – clears the current notifications from the buffer. A confirmations is requested before the buffer is cleared
YANG Development
YumaBench provides the ability to use the YANG development tools in YumaPro SDK from the Main Window SDK menu. The content in this section deals with how YumaBench helps you create YANG instrumentation for YumaPro SDK.
Note
YANG Development functionality is only available for Linux versions of YumaBench. To use this feature you must have YumaPro SDK installed on your system (see below).
The YumaPro SDK provides a multi-protocol YANG data-store server with a set of tools to develop and test YANG model instrumentation.
YumaPro SDK can be downloaded here: https://www.yumaworks.com/yumapro-sdk/#YumaProStartAnEval. Follow the SDK installation instructions in YumaPro Installation Guide
A tutorial on the fundamentals of YumaPro SDK and YANG development can be found here: Developer Quickstart
SIL and SIL-SA Creation in YumaBench
SIL (Server Instrumentation Libraries) are the instrumentation instances of YANG modules.
There are two types of SIL:
SIL – synchronous Server Instrumentation Libraries for YANG module(s) that reside in the same process space as the netconfd-pro server
SIL-SA – asynchronous remote Sub-Agents for YANG module(s) that reside in a different process space than the netconfd-pro server
There are two types of Creator:
Module – create a SIL or SIL-SA from a single YANG Module, optionally with Deviations
Bundle – create a SIL or SIL-SA from multiple associated YANG Modules, optionally with Deviations
Working with SIL and SIL-SA Code
More SIL and SIL-SA details can be found in the YumaPro Developer Manual: SIL and SIL-SA Overview
The graphical menus that enable SIL creation in YumaBench uses the tools in YumaPro SDK that provide creation from a Command Line Interface (CLI) in Linux.
SIL Creation Window in YumaBench |
Equivalent CLI SIL Creation Tool |
SIL Module Creator |
make_sil_dir_pro |
SIL-SA Module Creator |
make_sil_sa_dir |
SIL Bundle Creator |
make_sil_bundle |
SIL-SA Bundle Creator |
make_sil_sa_bundle |
Created Stub Files
The Bundle and Module Creators create their respective SIL or SIL-SA stub files. These stub files are used to add instrumentation and then build the .so dynamic libraries. The file structure created by the Creators is shown below:
<Output>
  +<Bundle or Module Name>
     <Bundle or Module Name>.log
     +bin
     +lib
     Makefile
     +src
        Makefile
        u_<module>.c
        u_<module>.h
        y_<module>.c
        y_<module>.h
In the src directory there can be multiple module groups if Deviations are added or for bundles.
The "u_*" files are those that you will add your instrumentation in the provided stub locations.
The "y_*" files are the system files and you should not modify those.
Once you have added your instrumentation you can then build and install the SIL or SIL-SA with:
$src: make
...

$src: sudo make install

...
If you “make” and “sudo make install” without adding any instrumentation a valid SIL or SIL-SA will be created that can be used in netconfd-pro server. It will just not have any active configuration or telemetry.
Bundle Creation
Bundle Creator creates SIL or SIL-SA stub files from multiple .yang modules and may include YANG deviations files and development environment include (.h) files.
Start by choosing the Bundle Creator you require, either SIL or SIL-SA, from the SDK | Code menu in the Main Window. For example: SDK | Code | SIL | Bundle:
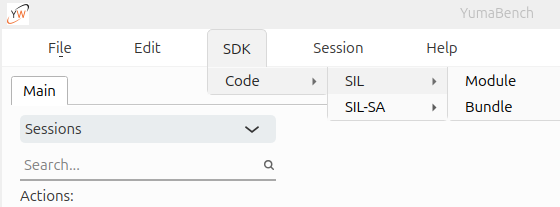
opens:
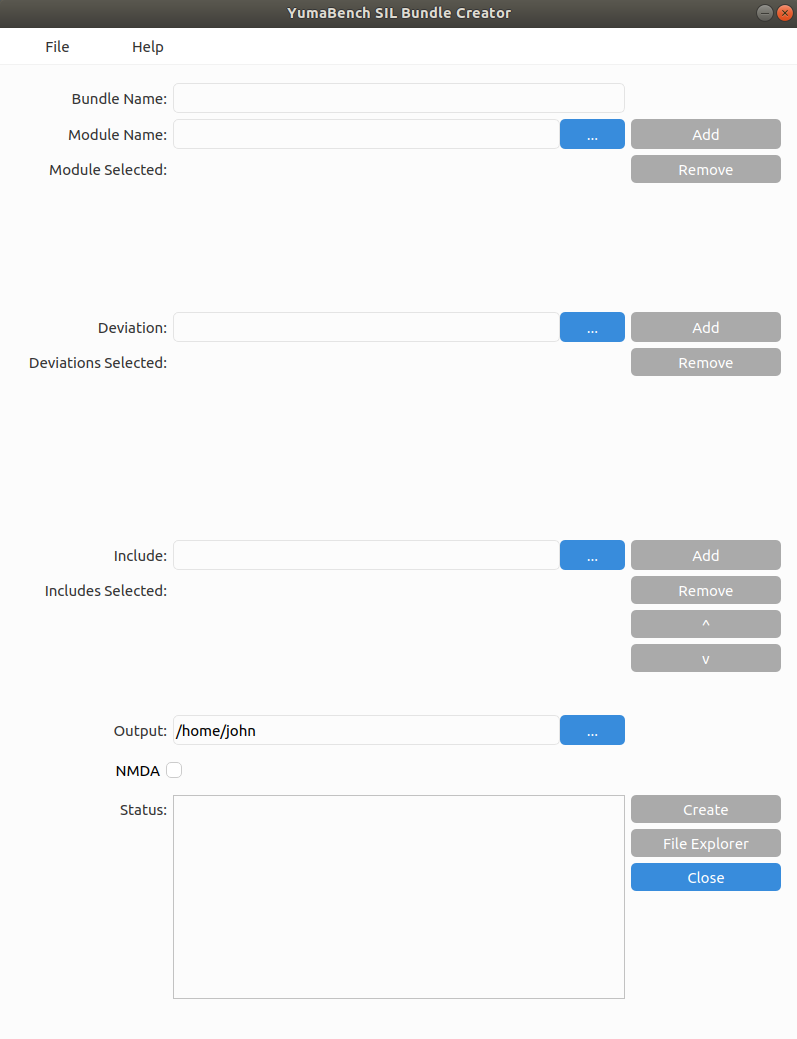
SIL and SIL-SA Bundle Creators have the same menu structure:
Mandatory fields: |
|
|
|
Module Name: |
Names of the YANG Modules to be included in the Bundle |
|
|
Optional fields: |
|
|
|
Include: |
Any system Include (.h) files to be added to the Bundle’s source files |
Bundle Help
Each Creator has a toolbar at the top of the window. They have two pull-down menus:
File – contains one item: Exit – that exits the creator. The same as “x” in the top right of the window and the blue <Close> button at the bottom right of the window.
Help – contains three help items
yangdump-pro manual – the underlying YumaPro SDK program that translates YANG modules into SIL or SIL-SA Modules or Bundles, displayed in your system’s default browser
YumaBench User Manual – displayed in your system’s default browser
YumaPro Developer Manual – the Developer Manual guides you through the development of SIL and SIL-SA modules and bundles, displayed in your system’s default browser
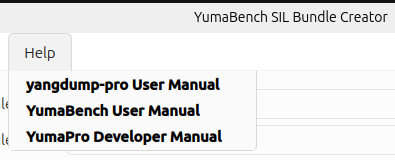
When you hover your mouse over a filed or button in the Creator window a help text window will appear to indicate what the field is for and whether it is required or optional.
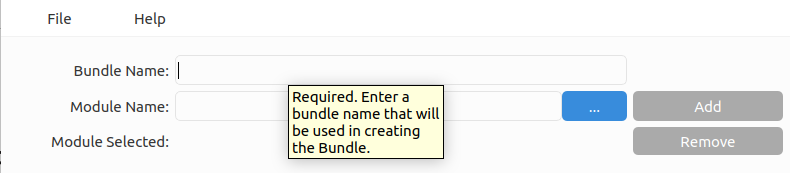
Name fields for Bundles, Include files and the Output path can have names entered as text. Multiple files names can be entered separated by a space. The blue three dot button ... can be used to launch the file explorer that allows file and path selection. File explorer allows the usual file selection models to work:
selecting a file or folder with a double click of the left mouse button or a single click and the selecting the <Open> button in the top right of the file explorer
selecting a group of individual files by holding the <Ctrl> key and clicking on the files with the left mouse button and the selecting the <Open> button in the top right of the file explorer
selecting a group of consecutive files by clicking on the first file with the left mouse button, holding the <Shift> key and then clicking on the last file in the group with the left mouse button and the selecting the <Open> button in the top right of the file explorer
selecting all the files displayed with <Ctrl>-A and the selecting the <Open> button in the top right of the file explorer
For module filed entries typing in the beginnings of a module name will search the YumaPro Module path for module names that match what has been typed so far:
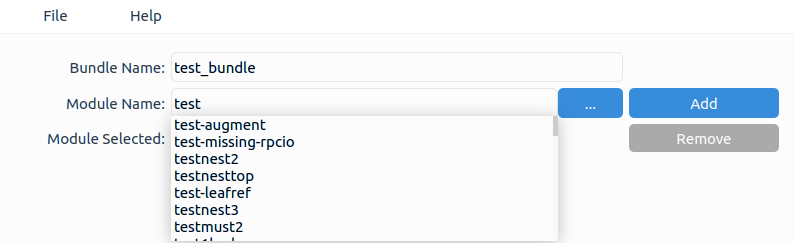
The user can then cursor down to the required module and press <Enter> to select the entry from the list.
Note
You should not include the module's .yang extension when adding YANG files manually. When YANG files are selected from either the drop down list or from the File Explorer the .yang extension is omitted for you.
Bundle Step 1: Create Bundle Name
Decide on a name for your bundle and enter it into the “Bundle Name:” field:
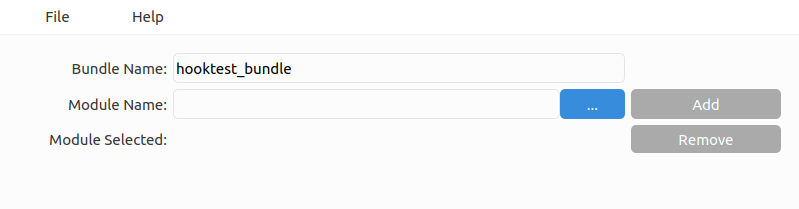
Bundle Step 2: Select YANG Modules
Select the YANG modules that will be part of this bundle. If they are in YumaPro Module path the YANG modules that match what you are typing will be presented for you to select. Alternatively you can use the File Explorer to navigate to the location of the YANG modules and select them:
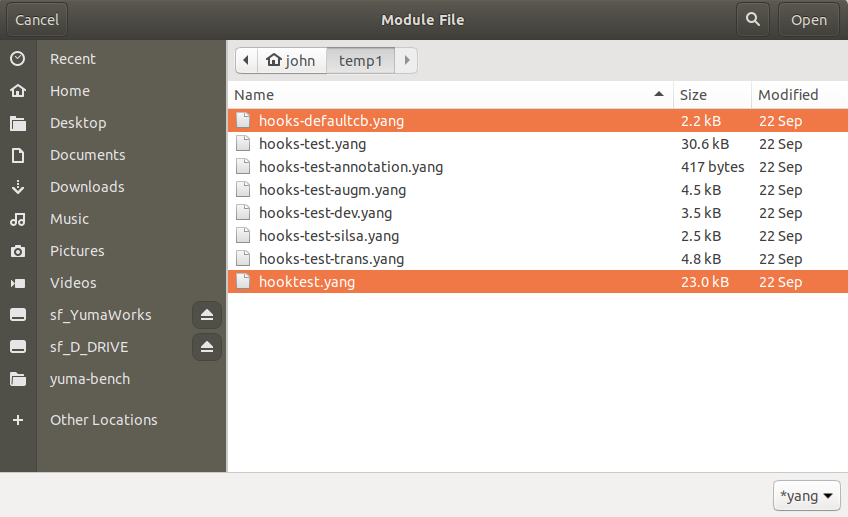
The modules you have selected are located in the “Module Name:” field:
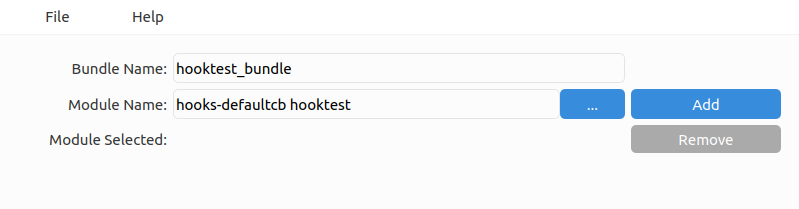
Select the Add button to the right of the Name field to add the modules to the “Modules Selected:” box:
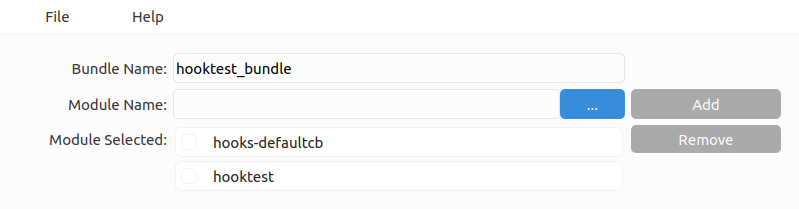
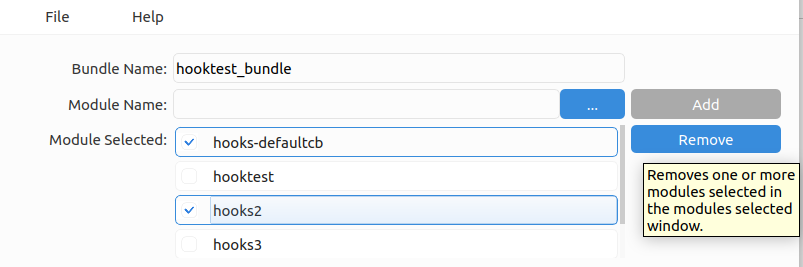
You can repeat adding modules as often as you wish. You can also remove modules by selecting them in the “Module Selected:” box and then selecting the Remove button to the right. The usual selection models work:
<Ctrl>-A selects all modules in the box
<Ctrl>-<left mouse> selects individual modules
<Shift>-<left mouse> selects a block of modules
Bundle Step 3: Select YANG Deviations (Optional)
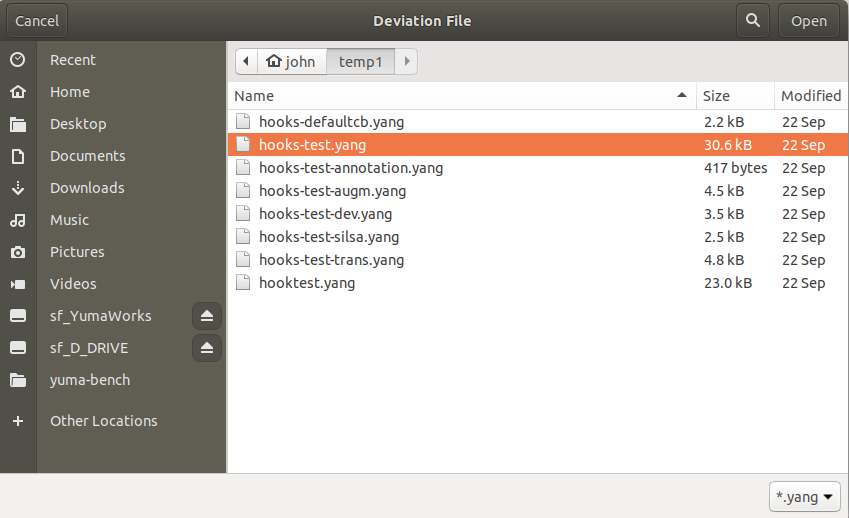
If the Bundle you are creating requires any YANG Deviations enter them in the “Deviation:” field the same way YANG modules are added as described above.
Bundle Step 4: Select System Include Files (Optional)
If your development environment requires system include (.h) files they can be added to the Bundle source code in the “Include:” field. Their names can be be typed in or selected with the File Explorer.
Note
The file extension should be included in the name. The file name(s) entered will be added to each .c and .h file in the SIL or SIL-SA stub files. From the example below this would be: #include "yw_extra.h", etc.
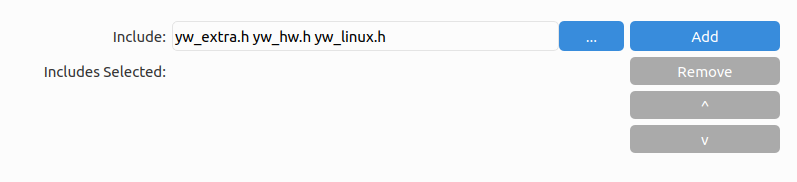
The system include files are added to the “Includes Selected:” box using the Add button. As these files can be order dependent you have the option to reorder the files using the “up” ^ and “down” V buttons on the selected files:
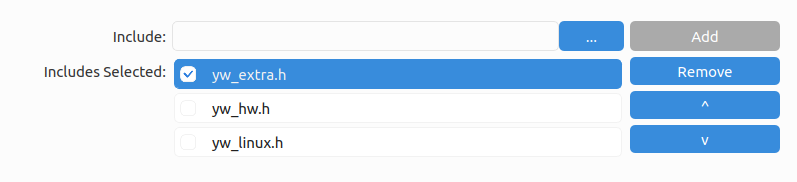
In the above example pressing the “down” V button twice would end up as shown below:
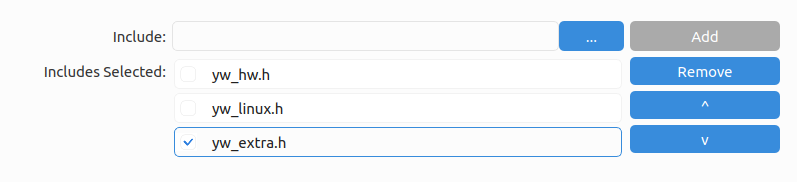
The above example would result the following being added to the .c and .h src files:
#include "yw_hw.h"
#include "yw_linux.h"
#include "yw_extra.h"
Bundle Step 5: Set The Output Path
In the “Output:” field enter the path where the SIL or SIL-SA Bundle will be created. This can be manually entered or selected with the File Explorer.
Bundle Step 6: Create The Bundle
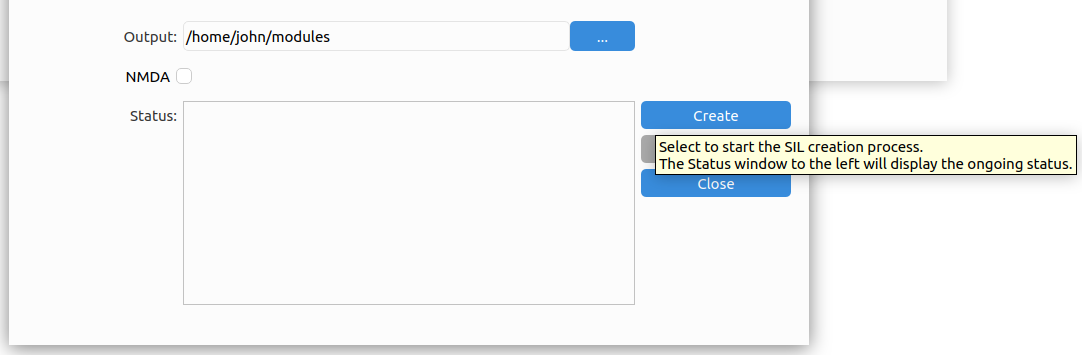
Now everything is setup the SIL or SIL-SA Bundle can be created by selecting the Create button. After a few seconds the “Status:” box will contain the output from the Bundle creation process.
The following message will popup if the Bundle was successfully created:
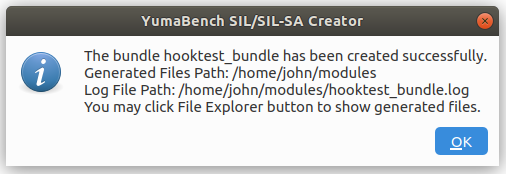
The popup tells you:
The Bundle was successfully created
The location, specified in the “Output” field, where the Bundle was created
Where in the “Output:” location the generated log file from the creation, the text contained in the “Status:” window
The File Explorer button is now active and if selected will launch the File Explorer displaying the location of the files that make up the SIL or SIL-SA Bundle:
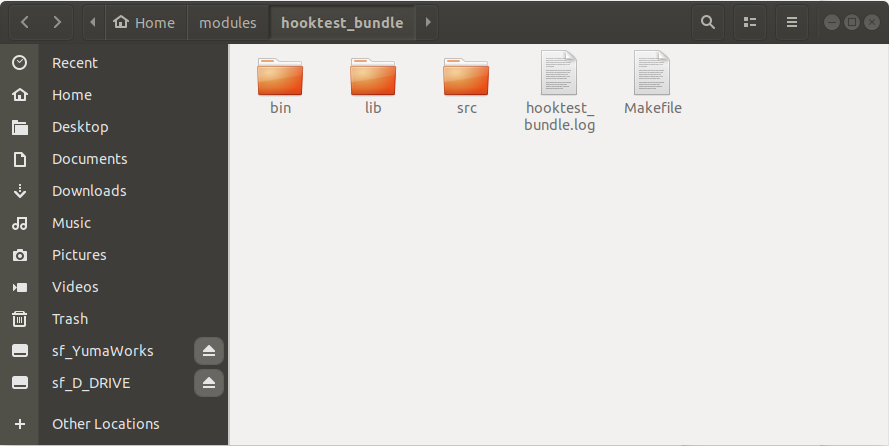
At this point you can exit the Creator with the Close button.
You can now go into the Bundles src directory, add any instrumentation you require in the .c and .h files and build a SIL or SIL-SA. For more details on this process read the introduction to this section and the links provided there.
Note
If you have specified Include (.h) Files in the Bundle make sure they are located in your development environment’s path. If they are not you can copy the Include Files to the Bundle’s src directory.
If there is a Failure Message displayed find some solutions and more information in the section: Creation Failure
Module Creation
Module Creator creates SIL or SIL-SA stub files from a single .yang module and may include YANG deviations files and development environment include (.h) files.
Start by choosing the Module Creator you require, either SIL or SIL-SA from the SDK | Code menu in the Main Window. For example: SDK | Code | SIL-SA | Module:
opens:
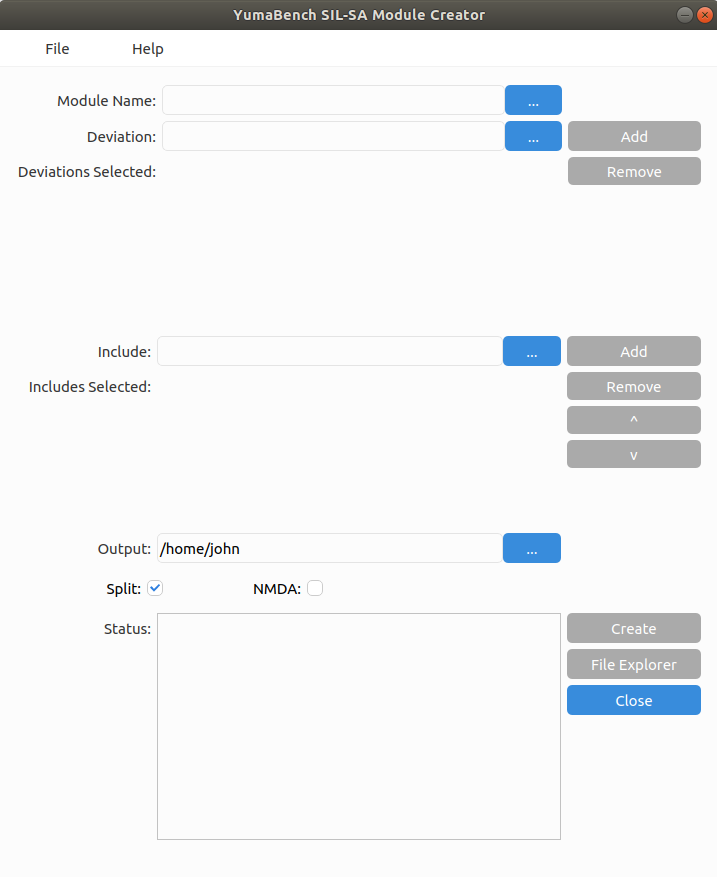
SIL and SIL-SA Module Creators have the same menu structure:
Mandatory fields: |
|
|
|
|
|
Optional fields: |
|
|
|
Include: |
Any system Include (.h) files to be added to the Module’s source files |
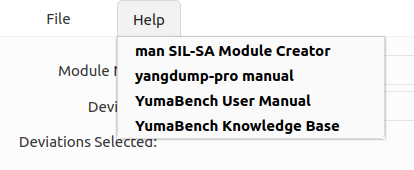
Module Help
Each Creator has a toolbar at the top of the window. They have two pull-down menus:
File – contains one item: Exit – that exits the creator. The same as the “x” and the Close button at the top and bottom right of the window respectively
Help – contains three help items
yangdump-pro manual – the underlying YumaPro SDK program that translates YANG modules into SIL or SIL-SA Modules or Bundles, displayed in your system’s default browser
YumaBench User Manual – displayed in your system’s default browser
YumaPro Developer Manual – the Developer Manual guides you through the development of SIL and SIL-SA modules and bundles, displayed in your system’s default browser
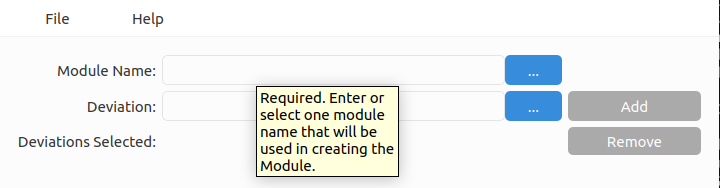
When you hover your mouse over a filed or button in the Creator window a help text window will appear to indicate what the field is for and whether it is required or optional.
Name fields for Modules, Include files and the Output path can have file names entered as text with multiple files separated by a space. The blue three dot button ... can be selected to launch the file explorer to allow file selection. The usual file selection models work:
selecting a file or folder with a double click of the left mouse button or a single click and the selecting the <Open> button in the top right of the file explorer
selecting a group of individual files by holding the <Ctrl> key and clicking on the files with the left mouse button and the selecting the <Open> button in the top right of the file explorer
selecting a group of consecutive files by clicking on the first file with the left mouse button, holding the <Shift> key and then clicking on the last file in the group with the left mouse button and the selecting the <Open> button in the top right of the file explorer
selecting all the files displayed with <Ctrl>-A and the selecting the <Open> button in the top right of the file explorer
For module filed entries typing in the beginnings of a module name will search the YumaPro Module path for module names that match what has been typed so far:
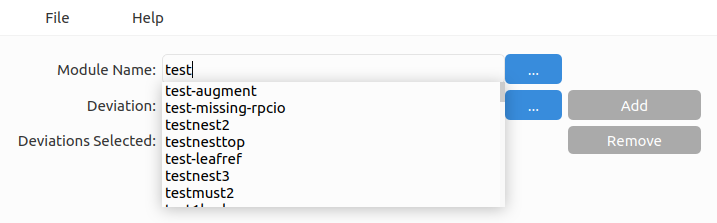
The user can then cursor down to the required module and press <Enter> to select the entry from the list.
Note
You should not include the modules .yang extension when adding YANG files manually. When YANG files are selected from either the drop down list or from the File Explorer the .yang extension is omitted for you.
The process for creating a Module is very similar to the process to create a Bundle described above.
Module Step 1: Select The YANG Module
Select the YANG module for this Module. If it is in YumaPro Module path the YANG modules that match what you are typing will be presented for you to select. Alternatively you can use the File Explorer ... button to navigate to the location of the YANG module and select it:
Module Step 2: Select YANG Deviations (Optional)
If the Module you are creating requires any YANG Deviations enter them in the “Deviation:” field the same way one or more YANG modules are added as described in the Bundle Creation section above.
Module Step 3: Select System Include Files (Optional)
If the Module you are creating requires any System Include (.h) files enter them in the “Include:” field the same way one or more Includes Files are added as described in the Bundle Creation section above.
Module Step 4: Set The Output Path
In the “Output:” field enter the path where the SIL or SIL-SA Module will be created. This can be manually entered or selected with the File Explorer.
Module Step 5: Create The Module
Now everything is setup the SIL or SIL-SA Module can be created by selecting the Create button. After a few seconds the “Status:” box will contain the output from the Module creation process.
The following message will popup if the Module was successfully created:
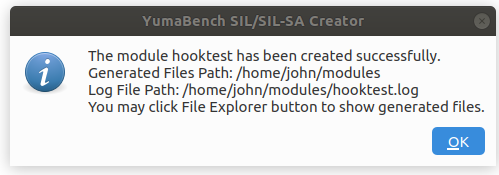
If there is a Failure Message displayed find some solutions and more information in the section: Creation Failure
Note
If you have specified Include (.h) Files in the Module make sure they are located in your development environment’s path. If they are not you can copy the Include Files to the Module’s src directory before you build the SIL or SIL-SA.
Creation Failure
Below are some common Creation failure messages.
Creation Failure: “already exists”
The Creators will not over-write existing Modules or Bundles.
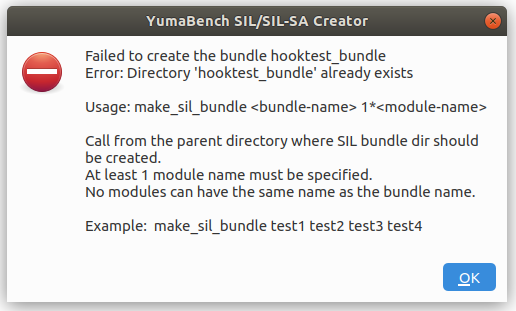
The simple way to remedy this message is to either delete or rename the Module or Bundle directory, in this case “hooktest_bundle” in the “Output:” directory. Re-create the Module or Bundle.
Creation Failure: “File not found”
A file is either not found or the file specified, in the example below “invalid.yang”, is not a valid YANG file.
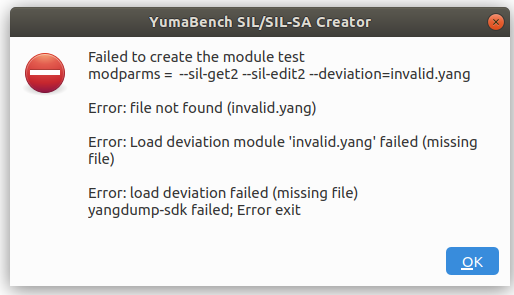
Make sure the file exists and that you have selected it correctly and that the file is a valid YANG file.
Creation Failure: “path failed (no nodes available)”
Messages such as the one below indicate there is an issue with the YANG model being created, such as references to part of the YANG model that doesn’t exist.
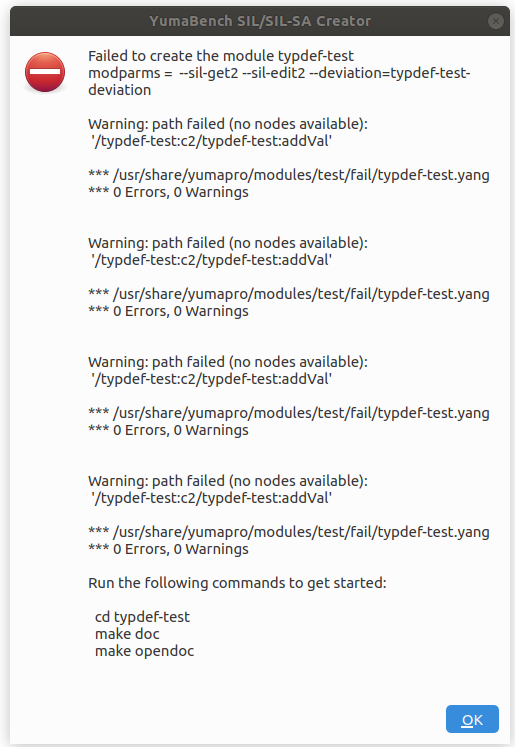
Review and correct the YANG definitions contained in the files specified in the Module or Bundle.
Configuration, Temporary Files and Debug
Configuration and Temporary Files
Various configuration files that contain the attributes of various windows used by YumaBench such as their last positions and sizes and the definitions of created users, devices, sessions, etc. are stored under $HOME/.config/YumaWorks on Linux and Windows systems, and under $HOME/.config/yumaworks.com on macOS. Most YumaBench files are in the yuma-bench/ directory, while yuma-bench.ini is in the parent directory. The .yangcli_pro_users.conf file can contain saved device passwords. On Linux and macOS, it is saved with owner-only permissions (0600). For existing files on Linux, run:
chmod 600 "$HOME/.config/YumaWorks/yuma-bench/.yangcli_pro_users.conf"
On macOS, use the corresponding yumaworks.com path:
chmod 600 "$HOME/.config/yumaworks.com/yuma-bench/.yangcli_pro_users.conf"
On Windows, use the file's Security properties to restrict read access to your account.
An example of the Linux files is shown below:
~$ ls -al $HOME/.config/YumaWorks/
total 16
drwxr-xr-x 3 john john 4096 Jun 13 11:12 ./
drwx------ 31 john john 4096 May 25 13:53 ../
drwx------ 5 john john 4096 Jun 13 11:10 yuma-bench/
-rw-r--r-- 1 john john 732 Jun 13 11:12 yuma-bench.ini
~$
~$ ls -al $HOME/.config/YumaWorks/yuma-bench
total 36
drwx------ 5 john john 4096 Jun 13 11:10 ./
drwxr-xr-x 3 john john 4096 Jun 13 11:12 ../
drwx------ 2 john john 4096 Jun 13 11:08 recordtest/
drwx------ 3 john john 4096 Jun 13 11:08 tmp/
drwx------ 2 john john 4096 Jun 13 11:08 .yangcli_cache/
-rw-r--r-- 1 john john 10 Jun 13 11:10 .yangcli_pro_aliases
-rw-r--r-- 1 john john 100 Jun 13 11:09 .yangcli_pro_devices.conf
-rw-r--r-- 1 john john 182 Jun 13 11:10 .yangcli_pro_sessions.conf
-rw------- 1 john john 108 Jun 13 11:12 .yangcli_pro_users.conf
Debugging Issues
Check out debug instructions in the YumaBench Knowledge Base located at: https://yumaworks.freshdesk.com/a/solutions/categories/1000133771/folders/1000236693
If file logging is enabled, each time YumaBench is launched it creates yuma-bench-current.log, which by default is located in $HOME/Documents. The log file from the previous run is saved as yuma-bench-previous.log.
$ ls -al $HOME/Documents/
total 368
drwxr-xr-x 2 john john 4096 Jun 13 14:27 .
drwxr-xr-x 5 john john 4096 Jun 12 16:48 ..
-rw-r--r-- 1 john john 5418 Jun 13 14:27 yuma-bench-current.log
-rw-r--r-- 1 john john 359104 Jun 10 10:37 yuma-bench-previous.log
There are several parameters that can be set in the yuma-bench.ini
mentioned in section Configuration and Temporary Files above. There are also
various parameters that can be supplied to YumaBench when running the
GUI from the command line. Running YumaBench with the --help option lists
the options as shown below:
~$ yuma-bench --help
Usage: yuma-bench [options]
YumaBench is a YANG GUI client using YumaPro SDK.

By default yuma-bench prints "warning" level logs to the terminal.

yuma-bench sets logging options using the following priority list:

  1. Flags passed via command line.
  2. Configuration set in $HOME/.config/YumaWorks/yuma-bench.ini
  3. Default values (may depend on release/debug build type).

If a flag can be controlled via config file, yuma-bench.ini, it's description
below will mention it.

Options:
  -h, --help                   Displays help on commandline options.
  --help-all                   Displays help including Qt specific options.
  -v, --version                Displays version information.
  --log-to-file, -f            Enable logging to a file. Logs will be saved in
                               the user documents folder.
                               Config file option: core/logToFile
  --log-dir-path, -p <Path>    Specify the directory path where yuma-bench logs
                               should be saved. When path is defined, -f is
                               implicitly defined as well.
                               Config file option: core/logDirectory
  --log-level, -l <Level>      Sets log verbosity. Available values are:
                               * off
                               * error
                               * warn
                               * info
                               * debug
                               * debug2
                               * debug3
                               * debug4
                               Config file option: core/logLevel
  --detailed-sdk-messages, -d  Enables detailed log messages from YumaPro SDK.
                               Best combined with "debug4" log level.
                               Config file option: core/detailedSdkLogs
  --no-detailed-sdk-messages   Disables detailed log messages from YumaPro SDK.
                               Using this flag will override any existing
                               setting from the config file.
                               Config file option: core/detailedSdkLogs
~$